No products in the cart.
Sailing Ellidah is supported by our readers. Buying through our links may earn us an affiliate commission at no extra cost to you.

The Different Parts Of A Sailboat Explained
A sailboat consists of hundreds of parts, each with its specific term and function. From stern to bow, keel to mast, each part and its equipment plays a vital role in making the vessel seaworthy and able to sail.
In this guide, I’ll show you most of the components so you can better understand what they are and their function. We’ll begin with the main components, move to the basic features, and finish with our interior and equipment.
The main parts of a sailboat
The main parts of a sailboat are the key components that make it a vessel able to sail. You’ll notice that the structure has several distinct differences from powerboats.
We can categorize the main parts into the following:
- Hull: The main structure, or “body” part of a boat.
- Keel: The heavy fin at the bottom allows stability under sail.
- Rudder: The fin sticking down at the stern, allowing us to steer the vessel.
- Mast: The “spars” or “poles” holding the sails.
- Rigging: The standing rig is the wires that supports the mast. The running rigging is all the lines that control the sails.
- Boom: The horizontal spar supporting the bottom of the mainsail.
- Sails: The canvas used to harness the energy of the wind.
Let’s dig a bit deeper into each of the components.
Hull – The main structure
A sailboat’s hull is the vessel’s main body or structure. The shape is vital to the boat’s performance and stability, and you have probably seen boats in many different forms. Older vessels are typically narrow, with a rounded underbody and a small stern. Modern designs have a flatter belly and broad stern supporting dual helm stations.
One of the hull’s primary functions is to displace water and provide buoyancy to keep the boat afloat. The hull is also the structure that holds the vessel’s living compartments and all its equipment. The main structure must be strong enough to withstand the forces of the water and any rough weather conditions that Mother Nature might throw at it.
Fiberglass (GRP), steel, aluminum, and wood are the most commonly used hull materials, each with pros and cons.
You can learn more about hull materials and their strengths in this article .
A monohull is a type of sailboat that has a single hull. Monohulls are classified into two categories based on weight and shape: planing and displacement hulls.
Sailboats with more than one hull are called multihulls. There are two types of multihulls: catamarans, which have two, and trimarans, which have three. These boats are typically designed with planing hulls.
Keel – The fin under the boat
The keel of a sailboat is a structural fin that extends downward from the bottom of the hull. There are several types of keels, each with unique characteristics and advantages. They all serve the same fundamental purpose of stabilizing the boat when we sail by adding lateral resistance in the water and weight at the vessel’s bottom.
Standard keel designs include:
- Lifting Keel
Some sailboats have a retractable centerboard functioning as their keel, allowing them to take the boat into shallower areas.
Rudder – To steer the boat
The rudder is a flat surface that sits perpendicular to the waterline. It is connected to the boat by a pivot point, allowing it to swivel left and right. When the steering wheel or tiller is turned, the rudder moves, creating drag in the water causing the boat to turn. The size and shape of the rudder can vary depending on the size and type of boat.
The most commonly seen rudder designs:
- Full skeg-supported
- Semi skeg-supported
Skeg-supported rudders are structurally one of the most reliable and robust constructions, but they are less efficient than a balanced rudder performance-wise. Balanced rudders pivot around their vertical center, giving less drag in the water and higher maneuverability at the cost of being a more vulnerable construction.
Twin rudders are often seen on modern performance sailboats with a wide stern. When the sailboat heel over , the leeward rudder gets better track through the water than a single rudder placed at the vessel’s center line. Contrary to some misconceptions, they can’t be controlled individually, even if the boat has two steering wheels.
Mast and Rigging – Supporting the sails
The mast is the long vertical spar that extends upward from the deck of a sailboat and holds the sails. It is the tallest part of the boat and is typically made of wood, aluminum, or carbon fiber. The mast is held in place by stays and shrouds, which form the sailboat’s standing rigging.
Depending on the rig the boat is manufactured with, there are several different types of masts. For example, a sloop-rigged sailboat will have only one main mast, while a ketch-rigged vessel will have a smaller additional mizzen mast placed further aft from the main mast.
There are two types of rigging:
- The Standing rigging consists of the stays and shrouds that keep the mast or masts in place.
- The Running rigging is the lines we use to hoist, lower, and control the sails.
Pro Tip: “S par” is a general term for a pole made of a solid material like wood, metal, or composite and is used to support a boat’s sail. The mast, boom, spreaders, and poles are defined as spars.
Boom – Supporting the mainsail
The boom is a horizontal beam extending from the mast and supporting the mainsail’s tack and clew (bottom two corners). It is attached to the mast by a hinge called a Gooseneck .
We use the boom to control the shape and angle of the mainsail to optimize its efficiency and power. Some booms also have a Vang or Rod-Kicker installed to assist in trimming the mainsail.
Sails – The canvas used to harness the energy of the wind
Most vessels have at least two sails, depending on the rig type and boat setup.
The Mainsail flies behind the mast, on top of the boom. Although it may not always be the largest sail on the vessel, we commonly refer to it as “the main.”
The Headsail(s ), located in front of the mast, are often of different sizes and shapes, and many sailboats have more than one. The Jib and Genoa are two of the most common types.
Different types of sails are used for various sail plans and situations, and you can learn more about them in this guide .
Now that we had a look at the main parts of the boat, let us dive deeper and look at the rest of the vessel.
The starboard and port side of the boat
Learning about the boat’s components is very important, but we must also know how to orient ourselves on the vessel. Using the words “left and right” on onboard often leads to confusion.
If you refer to something on the left side of the boat, the person facing you will be confused. He won’t know if you are referring to his or your left. This is where the terms “Port” and “ Starboard ” make better sense.
When facing the front of the boat or the bow , your left side of the boat is the port side, and the right-hand side is the starboard . If you turn around and face the back of the boat or the stern , your right-hand side will be the port side.
- A red light identifies the port side of a vessel.
- A green light identifies the starboard side of a vessel.
Windward and Leeward
- The windward side of the boat is the side facing the wind. If the wind comes from your right-hand side while facing forward, the starboard side is windward. This will be the boat’s high side as the wind heels the boat over.
- The leeward side of the boat is the side opposite to the wind. This will be the lower side of the ship while sailing as the wind heels the boat over.
Windward and leeward are two of the most important aspects to understand when sailing and navigating. Not only to identify equipment and gear on each side of the boat but to avoid collisions when sailing close to other vessels. There are rules on the water dictating which boat is “Stand On” and which has to “Give Way” depending on whether you are the windward or the leeward vessel in the situation.
Read this article to access a free course on navigation rules .
Basic parts of a sailboat
The boat’s bow is the front part, typically shaped like a “V” to cut through the waves. Larger vessels often have a locker for their anchor chain in this section, holding the anchor at the front.
The midship section is the center of the boat. Some refer to this part as amidships.
The stern is the rear or back part of the boat. It is also referred to as the aft . I’ve had French crew calling the stern the butt of the vessel, which is funny but also correct!
The beam is the widest part of the boat. Also referred to as the sides on the middle.
The transom is a flat surface across the stern of the boat.
The waterline is the part where the hull (body) of the boat meets the water. Many vessels have a painted stripe to mark the waterline, indicating how loaded the ship is. If you have too much stuff on board, the waterline goes underwater, and it is time to do some housekeeping!
The freeboard is the vertical part of the ship side between the water and the deck. When you see a blue boat like Ellidah, the freeboard is the blue part.
The deck is the “floor” of the boat when you are outside. You have probably heard the term “All hands on deck!” The front deck is the deck space in front of the mast. Side decks are the decks on the boat’s sides.
The mid-deck is between the cockpit and the mast. The aft deck is the deck behind the cockpit. Sailboats with aft cockpits often don’t have any aft decks, but some have a swimming platform instead.
The cockpit is the boat’s steering position and where you will find the helm.
The helm is the position the helmsman uses to steer the boat. Smaller sailboats often use a tiller to navigate, while most bigger yachts have one or two steering wheels.
Main parts below deck (inside the boat)
Let us look at the interior to highlight and learn about the parts we have below the deck.
The Companionway
The companionway is the “front door” of the boat. This is where the steps lead from the cockpit or deck down below. It is usually opened and closed using a hatch, two doors, or a plate.
The Galley
The galley is the boat’s kitchen. This is where sailors prepare their delicious meals.
The Saloon
The saloon is basically the boat’s living room, usually where you find the settee and dinette. This is where delicious meals from the galley are served together with refreshing beverages in good company.
The settee is the sofa or couch in a boat. It is also used as a sea berth to sleep in when sailing.
The dinette is the area where you can sit down at a table and eat your dinner. It’s also perfect for consuming rum and a game of cards in good company.
A cabin is often used as a bedroom in a boat but is not necessarily where you sleep. Many boats have more than one cabin.
A berth is a place in the boat where you can sleep. This doesn’t necessarily have to be a bed and can often include the sleeping space in the saloon. Sea-berth usually refers to a sleeping position where you are tucked well in and can sleep when the boat is heeling over and moving around.
The head is the toilet on a boat. If your skipper tells you to go and clean the head, getting out the shampoo won’t do you any good!
Nav station
The navigation station is usually a chart table and a console with mysterious instruments like radios, switchboards, and complicated electronics. This is where adventures are planned and the skipper’s favorite seat onboard.
The bilge is a space in the bottom of the hull where water collects and sometimes a storage space for all sorts of things. It usually contains a bilge pump to pump out water that finds its way into the boat in various places.
A v-berth is a bed in the front cabin shaped like a V.
A bulkhead is a wall inside the boat, usually supporting the structure.
Hardware and Equipment
Sailboats come equipped with a variety of different hardware and equipment. While the specific items may vary from boat to boat, there are some essentials that nearly every sailboat has.
A winch is a metal drum that gives you a mechanical advantage and is used to control and tighten lines. These can be operated by turning a line around it and pulling manually or by a winch handle to get more force.
Most modern winches are so-called “self-tailing,” which means they lock the line on so you can winch the line without holding on to it. Some boats even have electrical winches operated by a button.
A cleat is a fitting used to fasten a rope. Most boats have at least 6 of these. One on each side on the bow, midship and stern. These are used to secure the boat to a mooring buoy or key. Many ships have more cleats than this for various lines and ropes, and they can be used for anything as they are strong points fitted to the hull.
The sprayhood is the boat’s windshield that protects the people in the cockpit from sea spray. Some vessels have a canvas sprayhood that can be folded down or removed. Others have solid sprayhoods, often called a hard dodger or a doghouse .
The bimini is the cockpit’s “roof.” It protects you from the elements and shelters you from spray, rain, and burning sun rays! A bimini can be made of canvas or hard material. A hard bimini can also be called a hardtop .
Dinghy
A dinghy is a little boat you use to get from the mothership to shore when you are at anchor, also called a tender or annex . It can be everything from a small inflatable rubber kayak to a RIB or even a solid boat.
An essential and valuable piece of kit as it is the daily driver for most cruisers. It is like the car of a land crab, used for all commuting on the water and hauling important stuff like beer, rum, and food onboard. Dinghies often have electric or petrol engines, which we call outboards.
Dinghies are also great to use for watersports, such as wakeboarding!
Like Captain Ron said in the movie, fenders are the rubber bumper things you hang off your boat to prevent it from scratching against something like the pontoon or another ship. It is conveniently also used to sit on or as a backrest while relaxing on deck.
A boat hook is a long stick with a hook at the end. Used to grab lines, items, and stuff that is too far to reach by hand, like cushions flying overboard. It is also convenient as a tool to push the boat away from another craft or the key. Most vessels have them on board.
The guard rail can be a flexible wire or a solid metal rail surrounding the boat to prevent us from falling overboard. Some also use a net as an addition for increased safety.
The pushpit is a metal guard rail around the stern of the boat. This is where the guard rail is secured on the stern: a common place to mount the BBQ, life raft, and the outboard for the dinghy.
The pulpit is the metal guardrail on the bow. This is where the guard rail is secured onto the bow.
The stanchions are the metal bars that keep the guard rail in place around the boat between the pushpit and the pulpit.
An arch is a typical structure made of stainless steel on the back of a boat and is often used to mount a variety of items like antennas, radars, solar panels, wind generators, etc. It is also convenient to use for lifting the dinghy and its outboard.
Ground Tackle
The ground tackle consists of several things:
- Your anchor
- Your anchor chain
- The link between the two
- The connection between the chain and your boat
It includes all equipment holding your boat to the ground. Larger boats sometimes have two anchors on the bow.
A windlass is a winch that hoists and lowers the anchor and chain. Most boats have one on the bow and some on the stern. These incredible things can be electrical or manual (some are both) and are essential to anchor your boat when not in a port or marina.
VHF stands for “Very High-Frequency Radio.” It broadcasts on the VHF network and allows you to communicate with others around you. Sadly, you won’t be able to tune in to your favorite radio show on these.
Still, they are essential for contacting other boats and port authorities. It is also the radio you will transmit an emergency mayday over in case of emergency. VHF radios sometimes require a license, depending on the country you are in.
Chartplotter
A Chartplotter is a navigation computer that shows various information on a screen, like charts, routes, radar images, etc. It is another vital piece of equipment that helps you navigate and maneuver the boat.
Final words
I hope this guide has been helpful and not too overwhelming for you. We’ve covered many of the parts of a sailboat and its terms and functions, but this article only touches on the basics. If you want to keep learning about sailing, I have written several other guides to help you get started.
Now that you have a basic understanding of sailboats, it’s time to take the next step and dive into a sailboat’s standing rigging .
Sharing is caring!
Skipper, Electrician and ROV Pilot
Robin is the founder and owner of Sailing Ellidah and has been living on his sailboat since 2019. He is currently on a journey to sail around the world and is passionate about writing his story and helpful content to inspire others who share his interest in sailing.
Leave a Reply Cancel reply
Your email address will not be published. Required fields are marked *
Rigging Small Sailboats - Part 1
Rigging small sailboats.
Part 1 - Rigging in General
Introduction
T his is a basic "how-to" guide for rigging modern single masted sailboats up to about 25' in length. Any person building his own small sailboat, buying a new boat, or one who already owns a boat and wants to replace or change the rig on his boat will find this book valuable. We have attempted to write the book so it can be easily understood by both the beginning sailor as well as the "old salts". However, if you are looking for a "how-to-sail" book, or a book on competition "tuning and racing", or a book on "sailing theory," then this is not the book for you. What is here is practical information on basic rigging and how to install it.
R igging means putting the spars and related equipment in position so the boat is ready for sailing. Rigging also means these items as a functional unit once installed in the boat and made operational. Many terms used herein may sound strange to the beginner and appear to have no relation to the part they describe. Also, many of these terms have no similarity or counterparts to terms used on shore. Nevertheless, they are necessary to the business at hand. Important terms that you should know are initially noted in BOLD type and will be defined where they first appear, as well as in the glossary. Don't try to remember them all once, because after you see them a few times, you'll be able to relate the term to the function, and soon it will become second nature.
T he book is arranged in a logical sequence. PART I concerns mainly the definition and function of the various equipment used in rigging. PART II is the practical "how-to" section on rigging sailboats. All illustrations are noted by a "Figure number", the first number listed referring to the chapter. With the basic information presented, we think you will be able to completely outfit and rig your sailboat with ease and confidence. We have purposely limited the scope of this book so as not to overwhelm the beginner, and yet provide useful information to the large majority of small boat sailors; those who sail the modern rigged boats under 25' in length.
Rigs and Sails
E veryone knows what a sailboat is and most people have heard expressions such as "sloop" or "ketch." These words describe the configuration of the sails and masts on the boat, and we refer to this configuration as the RIG. Rigs have names which are defined by the number of masts the boat has; the number, shape, and locations of the sails; and sometimes by the position of the rigging on the boat. Most small sailboats under 25' have a single mast with one or two sails being used under normal sailing conditions.
T he SLOOP rig has one sail forward of the mast, and one sail aft of the mast. The stoop rig generally comes in one of two variations depending on where the FORESTAY (the wire which supports the mast from the forward side) joins to the mast. A MASTHEAD RIG, such as shown in Fig. 2-1, has the forestay connected to the mast at the very top of the mast (or MASTHEAD). A JIBHEAD RIG, as shown in Fig. 2-2, has the forestay connected to the mast at a point somewhat below the top of the mast. So, when we see a single masted sailboat with a sail fore and aft of the mast and with a forestay that goes to the top of the mast, we call it a "masthead rigged sloop"; and when the forestay is below the masthead, we call it a "jibhead rigged sloop".
A boat with a single mast located well forward in the boat and only one sail, which is aft of the mast, is called a CAT RIG (Fig. 2-3). Do not confuse this term with "catamaran," which is a twin hulled boat, but which may also have a "cat rig." Depending on the design, the mast of a cat rigged boat may or may not be supported with wires (called "stays"; see Chapter 4). Figure 2-4 shows a cat rig with a mast not supported with wires, and is referred to as a "freestanding" or "unstayed" mast.
A nother common rig used in small sailboats is the LATEEN RIG illustrated in Fig. 2-5. This rig uses a single mast, somewhat short, and usually unsupported with wires, onto which is attached two poles. A triangular shaped sail is then attached to these two poles, but not to the mast. The lower pole is sometimes not used, but the rig is still called a "lateen." The rigging of a lateen is usually very simple and uncomplicated.
S ails can be considered the "engine" or power plant of the sailboat, while the rigging can be considered the "transmission," or the means by which the power is transferred to the boat to create motion. Therefore, to understand the rigging, it is necessary to know something about the sail configuration, because both work together as a unit.
J ust about all small sailboat sails are triangular in shape, and the terms used in describing one will generally apply to all. Modern sails are most often made of synthetic fabric, usually polyester (Dacron or equivalent). Some Nylon is used but it is considered inferior because it stretches too much in use, except for special sails such as spinnakers (see following). Sails in the past were made from cotton fabric, and may be to this day, but these require more maintenance and care. The sail of Dacron is virtually maintenance-free; just keep them clean and dry, and check occasionally for damage (see Chapter 11).
S ails have names determined by their function and location on the boat. On boats which have only one sail, this sail is always called the MAINSAIL (the "main" sail on the boat). The lateen rig sail, while still a mainsail, is commonly called a "lateen" sail. Sloop rig sailboats have a mainsail also, and this is the sail located on the aft side of the mast. On sloop rigs, the sail forward of the mast is called the JIB, and the main and jib sail when used in combination for normal sailing are called the WORKING SAILS. The boat in Fig. 2-2 is under sail with main and jib working sails.
S ails other than working sails are sometimes used, especially when racing or cruising. Two of the most popular types are the GENOA jib and the SPINNAKER. The Genoa (commonly called "jenny") is actually just an oversize jib used to increase the sail area, and hence the performance of the boat. The boat in Fig. 2-1 is designed to use a Genoa jib. Sailboats under about 16' long seldom use a Genoa. The spinnaker is a parachute shaped sail (hence the nickname, "chute") used forward of the mast in place of the jib when sailing before or with the wind. Because the spinnaker is considered a "competition" item usually associated with larger boats, and requires specialized gear, it is beyond the scope of this book.
ANATOMY OF SAILS
T he common triangular sail is best discussed by referring to parts OF the sail, and parts IN the sail, or the actual components used in the construction of the sail. Our discussion of sail anatomy is comprehensive, but note that not all sails will have all the items mentioned. Fig. 2-6 should be followed in the discussion of sail parts. Now for the parts OF a sail.
T he LUFF of the sail is the forward part, or the part which is considered to meet the wind first. The LEECH is the aftermost part, while the FOOT is the lower edge of the sail. The HEAD of the sail is the topmost corner; the TACK is the forwardmost corner, and the CLEW is the aft corner of the sail. The ROACH refers to the up and outward curve in the leech of the sail. The amount of roach will vary with the sail. The lateen-type sail has little or no roach, while mainsails used on catamaran sailboats have considerable roach. Next, we will describe the parts built IN a sail.
T o the beginner, the most obvious part built into the sail is the INSIGNIA and sometimes a group of numbers. The insignia usually tells graphically what the name of the boat class is, while the number refers to the registration number given to that particular boat in the class organization. Obviously, not all sailboats belong to a class, nor do they all have numbers on the sails.
M ost mainsails have BATTENS built into them. These are semi-rigid thin strips, either of wood or synthetic material such as fiberglass or plastic, used to maintain the shape of the sail when underway. The battens fit into BATTEN POCKETS sewn into the sail. Battens in order to stay in the pocket can be tied in. A better type uses what is called a "lock-sleeve" pocket which makes it impossible for the batten to slip out, but can readily be removed so the sail can be folded. Battens are usually located at almost right angles to the leech, but sometimes one or two battens are located along the foot at right angles on LOOSE FOOTED mainsails and some jibs. A loose footed sail is one that is attached only at the tack and clew points along the foot. The boats in Figs. 2-2, 2-3, 2-4, and 2-5 all have loose footed mainsails. The position and size of the battens is usually determined by the sailmaker or the designer of the boat. Some sails, especially on certain catamarans, use battens which span clear across the sail.
O ther parts built into the sail are primarily those used to attach the sail to the rigging. At the head, tack, and clew, most sails have CRINGLES built in for attaching the sails. These are merely grommets which reinforce the sail at the hole. Most mainsails have extra sail reinforcing at the head of the sail and this is called the HEADBOARD. The strains on the sail at this point are great, and the headboard with a cringle through it distributes the stresses.
S everal methods are used to attach the sails to the mast, boom, or rigging. The jib and Genoa are attached to the forestay in sloop rigs with HANKS or snaps (Figs. 2-7 and 2-8). These are special hooks or rings used to secure the sails to the forestay as well as allowing them to slide up and down. The hanks are usually sewn into the luff of the sail. Probably the simplest method of attaching the mainsail on lateen rigs, or in boats which have free standing masts, is by means of a "sock" sewn right into the sail which slips onto the spars. Two varieties of sock-type sails are shown by Figs. 2-4 and 2-5. The sock-type sail is limited to very small boats, but makes a neat and inexpensive sail. Also used on small sails are loops or line which fasten around the spars.
O n most boats, the mainsail is attached to the aft side of the mast in usually one of two ways. The first method is with TRACK SLIDES, pieces of hardware sewn to the luff of the sail at intervals of several inches, and which slide on a track fastened to the mast. A better and more common method is the use of a BOLT ROPE. This is a piece of rope the length of the luff and sewn right into it. The bolt rope fits into a groove built into the aft side of the mast. On sails which are not loose footed, this same bolt rope and groove can also be used for attaching the foot to the boom. Or, if track slides have been used on the luff, they too can be used on a track fixed to the boom. For details on spars (mast and boom), see the next chapter.
Masts and Booms
M ost people know a SPAR when they see one, and in sailing, the spars are the "sticks" (mast and boom) to which the sails are attached. To BEND the sails means to attach the sails to the spars and rigging. The MAST is the more-or-less vertical member, while the BOOM is the more-or-less horizontal member attached in some manner to the mast, and usually capable of pivoting about the mast. Most sailboats of the type discussed in this book have one of each. One exception is the lateen rig, which often has two booms, with the upper boom correctly referred to as the "yard" (see Fig. 2-5).
S pars on sailboats are usually made either of wood (solid or hollow), or aluminum (extrusions or tubing, both hollow). It is not uncommon nor undesirable to have an aluminum mast and wood boom in combination. Some typical sections through masts and booms are shown in Figs. 3-1 and 3-2, both for wood and aluminum. Masts made from aluminum should be "anodized"; a special coating process which minimizes oxidization. It is also desirable to wax aluminum masts.
O bserve the methods used for sail attachment. The groove-type mast in either wood or aluminum makes the neatest installation besides being the most efficient. Wood booms are usually solid in the size boats being discussed in this book, due to the small relative size required for the boom. On small sails such as used on lateen rigs, the spars are often nothing more than round wood poles or aluminum tubing.
|
|
T he base of the mast always fits into some type of receptacle or apparatus which is called the MAST STEP. Many types of mast steps are used depending on the configuration desired. Putting the mast in position on the mast step is called STEPPING the mast (see Fig. 9-1). Some masts go through holes in the deck or cabin top and step onto the hull structure, while others bear directly on the deck or cabin top. The simplest type of mast step is the fixed type such as shown by Figs. 3-3 and 3-4. The mast is fixed in position on the step and no movement of the mast is possible, short of removing the mast. Most masts stepped through the deck use fixed steps. Another type is the rotating mast step shown in Fig. 3-5. This type allows the mast to turn or rotate with the direction of the mainsail for greater sail efficiency.
A convenient type of mast step, as far as ease of stepping the mast is concerned, is the pivoting type such as shown in Fig. 3-6. This type allows the mast to be laid into the step fitting, bolted, and pivoted up in position, as opposed to trying to lift it onto the step, which can be tricky, especially on a windy day or if it is a tall mast. With lightweight aluminum spars, it is desirable to use a mast base stiffener at the step when using the pivoting step in order to provide adequate bearing for the pivot bolt.
M any masts require extra reinforcement, and one method of doing this is by utilizing SPREADERS. These are cross members located on the mast at a predetermined location and jutting out sideways. Spreaders are always arranged in pairs, one on each side of the mast. The spreaders "push out" or spread the SHROUDS (the wires supporting the mast from the sides; see Chapter 4) to help stiffen the mast. While spreaders can be made of wood, it is common on small sailboats to have them made of metal tubing, usually stainless steel or aluminum, even when wood masts are used. Some boats do not have any spreaders, while others may have one, two, or more sets. Since spreaders are a necessary evil, (they get in the way and foul things aloft, not to mention added resistance and weight), it is best to have as few as possible.
| FIG. 3-4 This GLEN-L 11 has an adjustable mast step arrangement that allows the boat to be sailed as a cat rig when the mast is moved forward onto the fixed step (to the right), or as a sloop rig when the mast is moved aft along the metal bar base. | |
| FIG. 3-5 A rotating mast step allows the mast to turn with the boom and sail. This type of step can only be used on certain rigs as all the stays must be arranged in a way to permit the mast to turn. |
| FIG. 3-6 A pivoting mast step can be made using aluminum or steel plate or channel. The base has two upright plates welded or formed into a "U"-shape, spaced to match the width of the mast. A slot in each | |
T wo types of spreaders are used. One is the fixed-type where the spreader is rigidly mounted to the mast such as shown in Fig. 3-7. The other type is the pivoting or swinging type which is allowed to swing horizontally along a pivot point located on the mast. This type is illustrated in Fig. 3-8. Use the type specified for the boat you have in any case. Where the shrouds pass over or through the spreaders, there should be special fittings or spreader tips which prevent chafing of the shroud by the spreader. Often the spreader tips are adjustable in order to vary the tension of the shrouds. Most spreader tips have an open groove or hole through which the spreader passes. Note that the shrouds are allowed to move or slide on their own against the spreader tip. However, with the open groove type, some means of lashing or taping the shroud to the spreader tip must be provided. The reason for this is that when sailing at an angle of heel, the WINDWARD* shroud will be taut, and the LEEWARD* shroud becomes slack, which could allow the shroud to fall out of the leeward groove if not secured in place.
*WINDWARD - Toward the direction from which the wind is blowing. *LEEWARD - Downwind, or with the direction of the wind.
T wo other types of spreaders which are used for supplemental strengthening of the mast, or to combat localized stresses, are DIAMOND SPREADERS and JUMPER STRUTS (see Fig. 4-4 'a'). Diamond spreaders are cross members in pairs always used in conjunction with DIAMOND STAYS, which are wire rope stays fixed at either end to the mast. The diamond spreader "spreads out" the diamond stays at their mid-length each side of the mast. The term diamond comes from the fact that when the diamond stays and spreaders are in position, they form a shape like a diamond. An exception to this is when more than one diamond spreader pair is used per stay. Diamond spreaders are just like regular spreaders, except that they are usually smaller and shorter in length.
T he jumper strut is usually used only on jibhead rigs to reinforce the upper part of the mast. The jumper strut is located on the forward side of the mast jutting out horizontally forward, and combats the strain of the mainsail pulling aft on the mast. The JUMPER STAY passes through the strut, and is fastened to the mast at each end of the stay. The jumper strut is usually positioned to bisect the length of the jumper stay. Diamond stays and jumper stays are not required on all boats; just on those masts which require additional support.
T he top of the mast is called the MASTHEAD, and depending on the type of rig, the fittings located here will perform various functions. Masthead fittings will also vary depending on whether a wood or aluminum mast is being used. The masthead fitting for wood masts is usually a custom unit made by the builder (see Fig. 3-9). When building a boat using wood spars, it is usually necessary to fabricate a masthead fitting. The designer should provide details for making the masthead fitting. For aluminum masts, the masthead fitting is usually a ready-made unit or "kit"-type assembly to match the mast extrusion, such as illustrated in Figs. 8-4 and 8-5. Obviously a masthead fitting for a masthead rig will be more complex than for a cat or jibhead rig. In any case, the masthead fitting contains at least one SHEAVE (a grooved wheel or pulley) for the main HALYARD, the line used to hoist the sail. With masthead rigs, the masthead fitting has a sheave for the jib halyard as well, and usually incorporates attachment fittings for the stays, and sometimes for the shrouds also. When a sock-type sail is used, and when the mast has no stays, then no masthead fittings are required. In any case, the top of hollow spars should be capped to keep water out. On wood spars this can be a sheet metal cap, and with aluminum spars, the masthead fitting will usually do the job.
O n boats where the stays and shrouds do not go to the masthead, but fasten to the mast at some lower point as in jibhead rigs, other means are used to secure stays and shrouds to the mast. With wood spars, the conventional method used to attach the shroud and forestay is to use TANGS. Tangs are short metal straps usually with a crimp or bend to splay them out from the mast when in position. Another type does the same job, but these are of cast metal. The strap type usually has at least two holes; one for the stay attachment, and the other for fastening the tang to the mast. When aluminum masts are used, tangs bolted together through the mast can also be used for the shrouds, but the forestay usually uses another fitting called a HOUND (see Figs. 3-10 and 3-11). The hound wraps around the mast for bearing and has a fitting to receive the forestay. If used on a boat with a jib, then a JIB HALYARD BLOCK (fitting with a sheave used to lead the halyard and change its direction) is attached to the hound. If the shrouds and forestay land at the same point on the mast, then the tangs for the shrouds can be integral with the hound fitting.
| FIG. 3-10 & 3-11 A hound strap fitting for use on jibhead rigs with aluminum spars. The hound provides attachment for the forestay as well as a block for the external jib halyard. The main halyard can be run either internally or externally. If run externally, it would run down the forward side of the mast along with the jib halyard (the most common arrangement on small boats). | |
W hen using internal halyards (those which run inside the mast), some type of fitting must be provided for the mast where the halyards exit the mast. Internal halyards can only be used in a hollow mast, and where used, they usually exit at or near the mast base. The simplest fitting is merely a hole through the mast fitted with a FAIRLEAD (a fitting to give a line a "fair lead") to prevent chafing the line (see Fig. 3-12). Another arrangement is to use COAMING PULLEYS or SHEAVE BOXES which not only act as a fairlead, but have sheaves incorporated to change direction of the halyards as well as preventing chafing of the line (see Fig. 3-13). These fittings are usually fitted into the mast near the base. In selecting coaming pulleys and sheave boxes, be sure the sheave of the fitting will protrude far enough into the mast so the halyards will not chafe along the inside mast surface.
T he GOOSENECK is the fitting used to connect the boom to the mast and allow it to move freely, like a universal joint. On the small lateen rig boats the gooseneck is two connected loops which rotate independently (see Fig. 3-14). On conventional rigs, a basic gooseneck is the fixed base type which fastens to the mast. For better sail adjustment, the type of gooseneck which slides on a track or in the mast groove is superior (see Fig. 3-15). Whichever of these types is used, they can be bought as non-swiveling or as a ROLLER REEFING type. The non-swiveling type as shown in Fig. 3-15, does not permit the boom to rotate. The roller reefing type shown in Fig. 3-16, is used so the boom can rotate and allow the sail to be rolled onto the boom in order to reduce sail area when sailing in heavy winds. Goosenecks come in many styles both for wood and aluminum booms with or without the roller reefing feature.
T he CLEW OUTHAUL at the other end of the boom is similar in function to the masthead fitting. It is used to attach the clew of the sail to the boom. Where the mainsail is small, the clew outhaul is sometimes nothing more than a line tied to a cleat. Another method is to use a sheave in the end of the boom in order to gain some leverage so the sail can be pulled taut (see Fig. 3-17). With larger mainsails, the clew outhaul is best a slide fitting located on a length of track, or a type which fits into the boom groove if there is one (see Fig. 3-18). On aluminum booms, and especially when roller reefing is used, a boom outhaul fitting is used which performs the clew outhaul function as well as providing a tang for attaching the hardware used to control the sail .
O ther incidental fittings may often be attached to the spars as well. CLEATS (a fitting used to belay or secure a line, Fig. 3-19) or BOOM BAILS ("U"-shaped straps used to attach blocks to the boom, Fig. 6-2) are commonly used. A BOOM CRUTCH is another item sometimes used, which is not really a part of the boom. The boom crutch holds up the boom when the sails are furled and when hoisting the sail, in order to keep the boom in its proper position.

FIG. 3-19-A CLEAT is a fitting to which a rope may be belayed. This metal cleat is fastened to the side of a mast to belay a halyard, and is a typical example of a cleat.
Click HERE for Part 2
Home > Professional Rescue Boats > Stingray
PROFESSIONAL RESCUE BOATS
Hammerhead Rescue Boat
Stingray Rescue Boat
Manta Ray Rescue Boat
Inflatable Rescue Boat
Rigid Inflatable Rescue Boat

Home > Inflatable Boats > Rigid Inflatable Boats > Rascal
Home > Water Taxi > WT760

Home > Water Taxi > WT1800
Home > Inflatable Boats > Fully Inflatable Boats
Home > Inflatable Boats > Fully Inflatable Boats > Skipper

FEATURED POSTS

We have to moved to a new location in Las Pinas!

HOW TO BUY A WHITEWATER RAFT

Why should I buy an inflatable boat?
Learn How to Sail a Small Sailboat - The Parts of a Sailboat
When you are learning to sail, understanding the parts of a sailboat can be confusing. We have listed the major parts of a sailboat in the diagram below to help get you started.

The common sailboat comprises eight essential parts: hull, tiller, rudder, mainsail, mast, boom, jib and keel. The hull is the shell of the boat, which contains all the internal components. Its symmetrical shape balances the sailboat and reduces drag, or the backward pull caused by friction, as it moves in the water. Inside of the hull in the stern, or back of the boat, is the tiller, which is attached to the rudder in the water. Think of the tiller as the boat's steering wheel and the rudder as the tire. To maneuver a sailboat to the right, for example, you pull the tiller to the right side of the boat, causing the rudder to alter its direction.
If you think of the tiller as the steering wheel, then the sails and the keel are the engines. The mainsail is the larger sail that captures the bulk of the wind power necessary to propel the sailboat. Its vertical side attaches to the mast, a long upright pole, and its horizontal side secures to the boom, a long pole parallel to the deck. Sailors can rotate the boom 360 degrees horizontally from the mast to allow the mainsail to harness as much wind as possible. When they pivot the boom perpendicular to the wind, the mainsail puffs outward. Conversely, it goes slack when swung parallel to the wind. This freedom of movement allows sailors to catch the wind at whatever angle it blows. The jib is the smaller, fixed triangular sail that adds additional power for the mainsail. The keel, a long, slim plank that juts out from the bottom of the hull, provides an underwater balancing force that keeps the boat from tipping over. In smaller sailboats, a centerboard or daggerboard serves the same purpose as the keel, but can be raised or lowered into the water to allow for shallow water sailing.
Before a boat can move in the water, it first must be able to float. In the next section, we'll discover how something as heavy as a sailboat can stay afloat.
Floating depends on two things: displacement and density. Archimedes' principle, which explains the concept of buoyancy, states that in order for an object to float, it must displace an amount of water equal to its weight. As a sailboat's weight pushes downward and displaces water beneath it, an upward force equal to that weight holds the boat up.
Here's where density comes into play. To displace enough water to remain afloat without becoming submerged, a boat must have an average density less than water. For that reason, the hull of the boat is hollow. Whether the boat is made of concrete or fiberglass, its average density is less than water. Think about it: If you put a basketball and a bowling ball in a swimming pool, the air-filled basketball has an average density much less than that of water, so it will float. The solid bowling ball, however, will sink immediately. This is how anything from a small sailboat to an aircraft carrier can manage to stay on top of the water.
Surface area also helps to keep the boat afloat. More surface area gives an object a better chance to displace enough water to offset its own weight. For instance, a small ball of clay likely will sink before it can displace the amount of water equal to its weight. But if you flatten the ball into a thin pancake, there is more surface area to distribute the weight across and displace the water, so it will float. For more information on precisely how a steel ship can float, read how boats made of steel float on water when a bar of steel sinks.
RECENT POSTS
Reminder Regarding Our Authorized Resellers
Enhanced Community Quarantine Announcement
Ang Pagsagwan ni Aljon | Mission Possible
General Notice: Personnel Change
BangkaPro takes part in NDRRMC’s 36 Hour Earthquake Response Simulation Exercise
Successful First Annual Agent/Dealer Seminar and Training
Come Join Us For Our First Annual BangkaPro Seminar!
PVC vs Hypalon Fabric
- Types of Sailboats
- Parts of a Sailboat
- Cruising Boats
- Small Sailboats
- Design Basics
- Sailboats under 30'
- Sailboats 30'-35
- Sailboats 35'-40'
- Sailboats 40'-45'
- Sailboats 45'-50'
- Sailboats 50'-55'
- Sailboats over 55'
- Masts & Spars
- Knots, Bends & Hitches
- The 12v Energy Equation
- Electronics & Instrumentation
- Build Your Own Boat
- Buying a Used Boat
- Choosing Accessories
- Living on a Boat
- Cruising Offshore
- Sailing in the Caribbean
- Anchoring Skills
- Sailing Authors & Their Writings
- Mary's Journal
- Nautical Terms
- Cruising Sailboats for Sale
- List your Boat for Sale Here!
- Used Sailing Equipment for Sale
- Sell Your Unwanted Gear
- Sailing eBooks: Download them here!
- Your Sailboats
- Your Sailing Stories
- Your Fishing Stories
- Advertising
- What's New?
- Chartering a Sailboat
The Parts of a Sailboat (of which there are a great many!)
Some parts of a sailboat are very small and cheap, but are far from insignificant. Take the humble clevis pin for example; find one of these on the foredeck and you've cause to be concerned for the security of your rig!
If we were going to discuss all the parts of a sailboat here, it would be a very long article indeed - but relax, that's not going to happen.
Let's make a start with...
The Parts of a Sailboat Above Deck

Dacron is the usual choice of sailcloth for cruisers although laminated sails are becoming more common, and moulded sails are the first choice for racing sailors.
Read more about sails...
The Rigging
The standing rigging , generally made up in 1x19 stainless-steel wire, supports the mast.
The forestay and backstay secure the mast in the fore-and-aft plane, and the shrouds secure it athwartships.
The ends of the stays and shrouds are secured to the structural elements of the hull via chainplates.

The running rigging is the collective name for the lines (halyards, sheets, topping lifts, uphauls, downhauls etc) that control the sails. Their working ends are attached either directly to the sails or, in the case of the headsail, to the boom.
Read more about sailboat rigging...
These are the rigid struts, generally fabricated in alloy, wood or carbon fibre whose job it is to deploy the sails. For example:
- The spinnaker pole;
- The whisker pole;
- The bowsprit;
- The boomkin.
Read more about sailboat masts...
The Cockpit

Like many cruising boats, the Ted Brewer designed Whitby 42 ketch pictured above has a centre-cockpit, which allows for the provision of a sumptuous aft-cabin below. Nevertheless, aft-cockpit boats have a great following with seasoned cruisers too. So what the aft versus centre-cockpit pro's and con's?
Tillers and Wheels
Smaller boats tend to be tiller-steered while larger ones, as in the image above, have wheels. Tillers are attached directly to the rudder stock; wheels are located remotely and operate the tiller through chain or hydraulic linkage.
Each approach has their devotees, but what are the arguments for and against?
The Parts of a Sailboat Below the Waterline
Keels & rudders.

Keels provide three key attributes in varying amounts depending on their design : directional stability, ballast, and lift to windward.
Rudders provide steerage and a small contribution towards lift to windward. They are either:
- Outboard or inboard rudders, which can be
- Unbalanced, balanced or semi-balanced, and be
- Keel-hung, skeg-hung, transom-hung or spade rudders.
Rudder types are discussed here...

Driven by the boat's diesel engine, the propeller allows good progress to be made when the wind is not cooperating.
Under sail though the propeller is redundant and the fixed blades provide nothing but unwanted drag. This is greatly reduced if the blades can fold aft in a clamshell arrangement or feather in self-alignment with the water flow.
Sailboat propellers are either 2 or 3-bladed - and you can read more about them here...
Below Decks

There's no 'standard' layout for the below-decks accommodation on a sailboat, although the one shown above is a popular choice.
Some layouts work well for offshore sailing whereas others are much less suitable - here's why some succeed where others fail...
Recent Articles
GENERIC KPI Template
Aug 25, 24 07:21 AM
Gulfstar Hirsch 45 Sailboat Specs & Key Performance Indicators
Aug 25, 24 07:19 AM
Nicholson 35 Sailboat Specs & Key Performance Indicators
Aug 24, 24 02:27 PM
Here's where to:
- Find Used Sailboats for Sale...
- Find Used Sailing Gear for Sale...
- List your Sailboat for Sale...
- List your Used Sailing Gear...
Our eBooks...

A few of our Most Popular Pages...

Copyright © 2024 Dick McClary Sailboat-Cruising.com

A Guide to the Different Parts of a Sailboat

Table of Contents
Last Updated on November 29, 2023 by Boatsetter Team
When you use Boatsetter, you have the opportunity to choose from a myriad of different sailboat rentals from all over the United States and beyond . A sailboat is a perfect way to relax on the water, either on a solo adventure or on an excursion with friends and family.
When you rent a sailboat with Boatsetter, you will have the option to book a captained sailboat to enjoy your day out on the water or book bareboat to hone your sailing skills. Either way, you may be interested in the intricacies of a sailboat and its different parts. If this sounds like you, you have come to the right place. In this article, we go in-depth about the different parts of a sailboat so that you can be more knowledgeable about whatever boat you may choose and come away from reading this feeling more confident about the whole sailing experience.
A basic sailboat is composed of at least 12 parts: the hull , the keel , the rudder , the mast, the mainsail, the boom, the kicking strap (boom vang), the topping lift, the jib, the spinnaker, the genoa, the backstay, and the forestay. Read all the way through for the definition of each sailboat part and to know how they work.
Explore sailboats for rent near you or wherever you want to go

In short, the hull is the watertight body of the ship or boat. There are different types of hulls that a sailboat may have, and these different hulls will often affect the speed and stability of the boat.
Displacement Hulls
Most sailboats have displacement hulls , like round bottom hulls, which move through the water by pushing water aside and are designed to cut through the water with very little propulsion. The reason these are called displacement hulls is that if you lower the boat into the water, some of the water moves out of the way to adjust for the boat, and if you could weigh the displayed water, you would find that it equals the weight of the boat, and that weight is the boat’s displacement. One thing to know about displacement hulls is that boats with these hulls are usually limited to slower speeds.
Planing Hull
Another type of hull is a planing hull. These hulls are designed to rise and glide on top of the water when enough power is supplied. When there is not enough power behind the boat, these boats often act as displacement hulls, such as when a boat is at rest. However, they climb to the surface of the water as they begin to move faster. Unlike the round bottom displacement hulls, these planing hulls will often have flat or v-shaped bottoms. These are very common with motor-driven water vessels, such as pontoon boats, but they can also be found on smaller sailboats which allow them to glide quickly over the water.
Finally, sailboats can differ depending on the number of hulls that they have. There are three options: monohulls (one hull), catamarans (two hulls), and trimarans (three hulls).
Monohulls , which have only a single hull, will usually be the typical round bottom displacement hull or occasionally the flat bottomed or v-shaped planning hull. Catamarans have two hulls with a deck or a trampoline in between, with the extra hulls providing increased stability. Finally, trimarans have three hulls — a main hull in the middle and two side hulls used for stability. These trimarans have gained popularity because of their excellent stability and ability to go at high speeds.
When evaluating a sailboat , it is important to pay attention to the type of hull that the boat has because the type of hull a sailboat has can drastically change the sailing experience, especially when it comes to stability and speed.

All sailboats have a keel, a flat blade sticking down into the water from the sailboat’s hull bottom. It has several functions: it provides counterbalance, life, controls sideways movement, holds the boat’s ballast , and helps prevent the boat from capsizing. When a boat leans from one side to the other, the keel and its ballast counteract the movement and prevent the boat from completely tipping over.
As with hulls, there are a number of different types of keels, though the two most common types of keels on recreational sailboats are the full keel or the fin keel. A full keel is larger than a fin keel and is much more stable. The full keel is generally half or more of the length of the sailboat. However, it is much slower than the fin keel. A fin keel, which is smaller than the full keel, offers less water resistance and therefore affords higher speeds.
A more recent feature on sailboats is the “winged keel,” which is short and shallow but carries a lot of weight in two “wings” that run sideways from the keel’s main part. Another more recent invention in sailing is the concept of the canting keels, which are designed to move the weight at the bottom of the sailboat to the upwind side. This invention allows the boat to carry more sails.
The Rudder

A rudder is the primary control surface used to steer a sailboat. A rudder is a vertical blade that is either attached to the flat surface of the boat’s stern (the back of the boat) or under the boat. The rudder works by deflecting water flow. When the person steering the boat turns the rudder, the water strikes it with increased force on one side and decreased force on the other, turning the boat in the direction of lower pressure.
On most smaller sailboats, the helmsman — the person steering the boat — uses a “ tiller ” to turn the rudder. The “tiller” is a stick made of wood or some type of metal attached to the top of the rudder. However, larger boats will generally use a wheel to steer the rudder since it provides greater leverage for turning the rudder, necessary for larger boats’ weight and water resistance.

The mast of a sailboat is a tall vertical pole that supports the sails. Larger ships often have multiple masts. The different types of masts are as follows:
(1) The Foremast — This is the first mast near the bow (front) of the boat, and it is the mast that is before the mainmast.
(2) The Mainmast — This is the tallest mast, usually located near the ship’s center.
(3) The Mizzen mast — This is the third mast closest to the stern (back), immediately in the back of the mainmast. It is always shorter than the mainmast and is typically shorter than the foremast.
The Main Sail

The mainsail is the principal sail on a sailboat, and it is set on the backside of the mainmast. It is the main source that propels the boat windward.

A boom is a spar (a pole made of wood or some other type of lightweight metal) along the bottom of a fore-and-aft rigged sail, which greatly improves the control of the angle and the shape of the sail, making it an indispensable tool for the navigation of the boat by controlling the sailes. The boom’s primary action is to keep the foot (bottom) of the sail flatter when the sail angle is away from the centerline of the sailboat.
The Kicking Strap (Boom Vang)
The boom vang is the line or piston system on a sailboat used to exert a downward force on the boom, enabling one to control the sail’s shape. The vang typically runs from the base of the mast to a point about a third of the way out the boom. It holds the boom down, enabling it to flatten the mainsail.
The Topping Lift
The topping lift is a line that is a part of the rigging on a sailboat, which applies an upward force on a spar (a pole) or a boom. Topping lifts are also used to hold a boom up when it’s sail is lowered. This line runs from the free end of the boom forward to the top of the mast. The line may run over a block at the top of the mast and down the deck to allow it to be adjusted.

A jib is a triangular staysail set ahead of the foremost mast of a sailboat. Its tack is fixed to the bowsprit, the bow, or the deck between the bowsprit and the foremost mast. Jibs and spinnakers are the two main types of headsails on modern boats.
The Spinnaker

A spinnaker is a type of sail designed specifically for sailing off the wind from a reaching downwind course. The spinnaker fills up with wind and balloons out in front of the sailboat when it is deployed. This maneuver is called “flying.” The spinnaker is constructed of very lightweight material, such a nylon fabric and on many sailing vessels, it is very brightly colored.
Another name for the spinnaker is the “chute” because it often resembles a parachute, both in the material it is constructed from and its appearance when it is full of wind.
People often use the term genoa and jib as if they were the same thing, but there is a marked difference between these two types of sails. A job is no larger than a foretriangle, the triangular area formed by the mast, the deck or bowsprit, and the forestay. On the other hand, a genoa is larger than the jib, with part of the sail going past the mast and overlapping the mainsail. These two sails, however, serve very similar purposes.
The Backstay

The backstay is a standing rigging that runs from the mast to the transom (the vertical section at the back of the boat), counteracting the forestay and the jib. The backstay is an important sail trip, control and directly affects the mainsail’s shape and the headsail.
There are two general categories of backstays:
1) A permanent backstay is attached to the top of the mast and may or may not be readily adjustable.
2) A running backstay is attached about two-thirds up the mast and sometimes at multiple locations along the mast. Most modern sailboats will have a permanent backstay, and some will have permanent backstays combined with a running backstay.
The Forestay

A forestay is a piece of standing rigging that keeps the mast from falling backward. It is attached at the very top of the mast, or at certain points near the top of the mast, with the other end of the forestay being attached to the bow (the front of the boat). Often a sail, such as a jib or a genoa, is attached to the forestay.
A forestay might be made from stainless steel wire, stainless steel rod or carbon rod, or galvanized wire or natural fibers.
Parts of a sail
Sails are vital for sailboats, made up of complex parts that improve performance and maneuverability. In this section, we’ll take a closer look at the different parts of that make up the sails.
Luff – The luff is a vertical sail part that maintains its shape and generates lift by interacting with the wind. It attaches securely with a bolt rope or luff tape for easy hoisting.
Leech – The leech controls air flow and reduces turbulence. Battens or leech lines are used to maintain shape and prevent fluttering.
Foot – The foot of a sail connects the luff and leech at the bottom edge. It helps define the sail’s shape and area. The outhaul is used to adjust its tension and shape.
Head – The sail’s head is where the luff and leech meet. It has a reinforced section for attaching the halyard to raise the sail.
Battens -The b attens are placed horizontally in sail pockets to maintain shape and optimize performance in varying wind conditions. They provide structural support from luff to leech.
Telltales – Sailors use telltales to adjust sail trim and ensure optimal performance.
Clew – The clew is important for shaping the sail and connecting the sheet, which regulates the angle and tension, producing energy. It’s located at the lower back corner of the sail.
Sailing is a favorite pastime for millions of Americans across the country. For some, there is nothing better than gliding across the water propelled by nothing more than the natural force of the wind alone. For both experienced and non-experienced sailors alike, Boatsetter is the perfect place to get your ideal sailboat rental from the mouthwatering Florida keys to the crystal blue waters of the Caribbean .
Smaller sailing boats are perfect for a single day out on the water, either by yourself or with friends and family. In comparison, larger sailing boats and sailing yachts can allow you days of luxury on longer excursions full of adventure and luxury.
Whatever your sailing dreams are, it is always good to know, for both the experienced sailor and the novice, all about the sailboat’s different parts. In this article, we learned all about the boat’s hull, the keel, the rudder, the mast, the mainsail, the boom, the kicking strap (boom vang), the topping lift, the jib, the spinnaker, the genoa, the backstay, and the forestay, which make up the basic parts of any sailboat you might find yourself on.
About us
Boatsetter is the go-to app for boat rentals and on-water experiences. Whatever the adventure, we’ve got a boat for that—Set sail , start the party , go yachting , make your trophy catch , and hone your watersports skills! Download the Boatsetter app ( App Store | Google Play ). Make sure to follow @boatsetter on Instagram, and tag us in all your boat day pictures for the chance to be featured.
Rent. List. Share—Only at Boatsetter
Boatsetter empowers people to explore with confidence by showing them a world of possibility on the water. Rent a boat, list your boat, or become a Boatsetter captain today.
Browse by experience

Explore articles

How to Get More Boatsetter Bookings

Peanut Island Boating Guide

Boating for Beginners: How to Start Boating

The Secret to Happiness? Experience trumps material possession every time!
- PRO Courses Guides New Tech Help Pro Expert Videos About wikiHow Pro Upgrade Sign In
- EDIT Edit this Article
- EXPLORE Tech Help Pro About Us Random Article Quizzes Request a New Article Community Dashboard This Or That Game Happiness Hub Popular Categories Arts and Entertainment Artwork Books Movies Computers and Electronics Computers Phone Skills Technology Hacks Health Men's Health Mental Health Women's Health Relationships Dating Love Relationship Issues Hobbies and Crafts Crafts Drawing Games Education & Communication Communication Skills Personal Development Studying Personal Care and Style Fashion Hair Care Personal Hygiene Youth Personal Care School Stuff Dating All Categories Arts and Entertainment Finance and Business Home and Garden Relationship Quizzes Cars & Other Vehicles Food and Entertaining Personal Care and Style Sports and Fitness Computers and Electronics Health Pets and Animals Travel Education & Communication Hobbies and Crafts Philosophy and Religion Work World Family Life Holidays and Traditions Relationships Youth
- Browse Articles
- Learn Something New
- Quizzes Hot
- Happiness Hub
- This Or That Game
- Train Your Brain
- Explore More
- Support wikiHow
- About wikiHow
- Log in / Sign up
- Cars & Other Vehicles
How to Sail a Boat
Last Updated: May 13, 2022 Approved
This article was co-authored by Nitzan Levy . Captain Nitzan Levy is a Sailor, Social Entrepreneur, and the Founder of Sailors NYC, a recreational sailors’ club based in Jersey City, New Jersey that specializes in cruising boats and a variety of community programs. Capt. Levy has over 20 years of sailing experience and has sailed in many places around the world including: the Atlantic Ocean, the Mediterranean Sea, The Caribbean, and the Indian Ocean. Capt. Levy is a U.S. Coast Guard Licensed Master of vessels up to 50 Tons with Auxiliary Sail and Assistance Towing Endorsements. Capt. Levy is also a NauticEd Level V Captain Rank Chief Instructor, an American National Standards Assessor, an SLC instructor, an ASA (American Sailing Association) Certified Instructor Bareboat Chartering, and an Israeli licensed skipper on Boats for International Voyages. There are 9 references cited in this article, which can be found at the bottom of the page. wikiHow marks an article as reader-approved once it receives enough positive feedback. This article received 25 testimonials and 92% of readers who voted found it helpful, earning it our reader-approved status. This article has been viewed 976,120 times.
For centuries, the sea has captured the spirits of sailors and adventurers all over the world. In his poem "Sea Fever", John Masefield claimed that all he needed was "a tall ship and a star to steer her by" to feel complete. Breaking into the sailing world can be challenging, but this article will help guide you through the ebb and flood of the nautical world. As a note, this article will help get you started, but it cannot be overstated that before you begin, have an experienced sailor show you the standing and running rigging on your boat and their functions before you venture out on the water on your own.
Gaining a Basic Knowledge of Sailing

- Block: This is the nautical term for a pulley.
- Boom: The horizontal support for the foot of the mainsail which extends aft of the mast. This is what you want to watch out for when changing directions in a sailboat. It can give you quite a wallop on the head if it hits you.
- Bow: This is what the front of the boat is called.
- Centerboard: This is a (usually fiberglass) plate that pivots from the bottom of the keel in some boats and is used to balance the boat when under sail.
- Cleat: Cleats are what lines (or ropes) get fastened to when they need to be kept tight.
- Halyard: Lines that raise or lower the sails. (Along with the sheets, aka running rigging.)
- Hull: The hull is the body of the boat and consists of everything below the deck.
- Jib: This is the sail at the bow of the boat. The jib helps propel the boat forward.
- Genoa: A foresail which is larger than a jib.
- Keel: The keel is what prevents a boat from sliding sideways ("making leeway") in whatever way the wind is blowing and stabilizes the boat.
- Line: Lines are ropes. They are everywhere on boats. There is only one "rope" on a sailboat, the bolt rope which runs along the foot of the mainsail.
- Mainsail: As the name implies, this is the mainsail of the boat. It is the sail attached to the back of the mast.
- Mast: The mast is a large, vertical pole that holds the sails up. Some boats have more than one mast.
- Painter: This is a line positioned at the front of small boats. It is used to tie the boat to a dock or another boat.
- Rudder: The rudder is how the boat is steered. It is movable so that when you turn the wheel or tiller, the rudder directs the boat in the direction you would like the boat to go.
- Sheets: The lines that control the sails. (aka running rigging.)
- Spinnaker: The usually brightly colored sail used when sailing downwind or across the wind.
- Stays and Shrouds: Some wires make sure the mast stays upright, even in very heavy winds. (aka standing rigging.)
- Stern: This is the term for the back of the boat.
- Tiller: The tiller is a stick attached to the rudder and is used to control the rudder.
- Transom: This is what we would call the butt of the boat. It is the back part of the boat that is perpendicular to its centerline.
- Wheel: The wheel works the rudder, steering the boat.
- Winch: Winches help tighten the sheets and halyards. When these lines are wrapped around a winch (in a clockwise direction), a sailor can turn the winch with a winch handle, providing mechanical advantage which makes it easier to bring in the lines.

- Sloop : Sloops are the most common type of sailboat (when you think of a sailboat this is probably the one you picture in your mind.) It has a single mast and is rigged up with a jib in the front and a mainsail attached to the back of the mast. They can range in size and are ideal for sailing upwind.
- Catboat : A Catboat has a mast set up near the front of the boat and is a single-sail boat. They are small (or large, for that matter) and easily operated by one or two people.
- Cutter : Cutters have one mast with two sails in the front and a mainsail on the back of the mast. These boats are meant for small crews or groups of people and can be handled relatively easily.
- Ketch : A Ketch has two masts, with the second mast called the mizzen mast. The mizzen is shorter than the mainmast and is in front of the rudder.
- Yawl : Yawls are similar to ketches with the difference being that their mizzen masts are located behind the rudder. The reason for this placement is that the mizzen on yawls is for keeping balance, rather than for moving the boat forward.
- Schooner : Schooners are large sailboats with two or more masts. The mast in the back of the boat is either taller or equal in height to the mast at the front of the ship. Schooners have been used to commercially fish, transport goods and as warships.

- Port: When you are facing the bow (the front of the boat) the side to your left is the port side.
- Starboard: Starboard is the right side of the boat when facing the bow.
- Windward: As the name might imply, windward is the direction from which the wind is blowing, upwind.
- Leeward: This is also called ‘Lee’. This is the direction to which the wind is blowing, downwind.
- Tacking: Tacking is when you turn the bow of the boat through the wind so that the wind switches from one side of the boat to the other. This is when you most need to be mindful of the boom, as the boom will swing from one side of the boat to the other when you tack (you don’t want to be in its way when it does that.)
- Gybing (Jibing): This is the opposite of tacking, which means that it is when you turn the stern (or back) of the boat through the wind so that wind shifts to the other side of the boat. This is a more dangerous maneuver in a strong breeze than tacking since the boat's sails are always fully powered by the wind, and may react violently to the change in the orientation of the boat to the wind. Care must be exercised to control the boom during this maneuver as serious injury is a possibility if the boom travels across the cockpit uncontrolled.
- Luffing: This is when the sails begin to flap and lose drive caused by steering the boat into wind or easing (loosening) sheets.

Preparing The Boat

- Check the lines ( running rigging ) that raise and control the sails ( halyards and sheets respectively). Make sure that they are separated, not wrapped around each other or fouled on anything else, and that they all have a figure-eight knot or other stopper knot on the free ( bitter ) end so they cannot pull through the mast or sheaves.
- Pull all lines out of their cleats and off their winches. There should be nothing binding any line; all should be free to move and be clear at this point.
- If you have a topping lift—a small line that holds the back of the boom up and out of the way when the sail isn't in use—let it out until the boom sags downward freely, then re-tie or re-cleat it. Watch out for the boom; it's just swinging around at this point; it will cause a painful "clunk" if it happens to hit you or your crew. The boom will return to its normal, horizontal position when you hoist the mainsail completely.
- If so equipped, be sure that the tiller is properly attached to and controls the rudder. Your sailboat is now prepared for you to hoist the sails!

- If your boat doesn't have a windex, tie a couple of nine-inch pieces of old cassette tape, VHS tape, or oiled yarn to the shrouds—the rigging cables that hold up the mast. Place them on each side, about four feet up from the sides of the boat. These will show you from which direction the wind is blowing, although some sailors find cassette tape to be just too sensitive for this purpose.

- If your boat has a motor, use the motor to keep the boat pointed into the wind while you hoist sail.
- Here's a handy tip: if the water is not deep at your dock, or if you have no side pier, walk the boat out away from the dock and anchor it into the sand, and the boat will automatically point itself into the direction of the wind!
Hoisting The Sails

- There will be a small line ( outhaul ) attaching the rear corner of the mainsail ( clew ) to the end of the boom. Pull it so the foot of the main is taut, and cleat. This helps the mainsail have a smooth shape for the air flowing over it.
- Hoist the mainsail by pulling down on its halyard until it stops. It will be flapping around ( luffing ) like crazy, but that's OK for a short period of time. (Excessive luffing will drastically reduce the life and durability of the sail).
- The leading edge of the sail ( luff ) must be tight enough to remove folds, but not so tight as to create vertical creases in the sail.
- There will be a cleat in the vicinity of the halyard where it comes down from the top of the mast. Cleat the halyard. Using the jib halyard, raise the front sail ( jib , genoa or simply the headsail ), and cleat the halyard off. Both sails will be luffing freely now. Sails are always raised mainsail first, then the jib, because it's easier to point the boat into the wind using the main.

- Turn the boat to the left ( port ) or right ( starboard ) so it's about 90 degrees off the wind. This is known as a beam reach .
- Pull on the main sheet ( trimming ) until the sail is around 45 degrees away from straight back ( aft ). This is a safe place for the main while you trim the jib.
- You will start moving and tilting ( heeling ) away from the wind. A heel of more than 20 degrees usually indicates that you're being overpowered. Releasing the mainsheet momentarily ( breaking the main ) will lessen the amount of heel, and you will return to a more comfortable sailing angle of 10 to 15 degrees.

- The jib will form a curve or pocket; trim the sail until the front edge just stops luffing. Keep your hand on the tiller (or helm ) and stay on course!

- If you or the wind hasn't changed direction, this is the most efficient place to set the sails. If anything changes, you have to adjust them in response.
- You have just entered the world of the sailor, and you will have to learn to do many things at once, or suffer the consequences.
Sailing Your Boat

- When the wind is at your back and side ( aft quarter ), it's called a broad reach . This is the most efficient point of sail as both sails are full of wind and pushing the boat at full force.
- When the wind is at your back, you are running with the wind . This is not as efficient as reaching, because air moving over the sail generates lift and more force than just the wind pushing the boat.
- When running with the wind, you can pull the jib over to the other side of the boat where it will fill. This is called wing-on-wing , and you have to maintain a steady hand on the tiller to keep this sail configuration. Some boats have a "whisker pole" which attaches to the front of the mast and the clew of the jib which makes the jib much easier to control and keep full of wind. Be sure to be vigilant of obstacles and other vessels, as having both sails in front of you blocks a significant portion of your view.
- Be careful —when the boat is running, the sails will be way off to the side, and because the wind is basically behind you the boom can change sides suddenly ( jibe or gybe ), coming across the cockpit with quite a bit of force.
- If you have a wind direction indicator at the top of your mast, do not sail downwind (run) so that the wind indicator points toward the mainsail. If it does, you are sailing with the boom on the windward side ( sailing by the lee ) and are at high risk of an accidental jibe. When this happens the boom can hit you with enough force to knock you unconscious and out of the boat ( overboard ).
- It's a good practice to rig a preventer (a line from the boom to the toe rail or any available cleat) to limit the travel of the boom across the cockpit in case of an accidental gybe.

- On most sailboats this will be about 45 degrees from the wind direction.
- When you've gone as far as you can on this tack, turn the boat through the wind (or changing direction by tacking ), releasing the jib sheet out of its cleat or off the winch drum as the front of the boat ( bow ) turns through the wind.
- The main and boom will come across the boat. The mainsail will self-set on the other side, but you will have to quickly pull in the jib sheet on the now downwind side to its cleat or winch, while steering the boat so the mainsail fills and begins to draw again.
- If you do this correctly, the boat won't slow down much and you will be sailing to windward in the other direction. If you're too slow tightening the jibsheet again and the boat bears off the wind too much, don't panic. The boat will be pushed sideways a little until it gains speed.
- Another scenario would be to fail to put the bow of your boat through the wind quickly enough and the boat comes to a complete stop. This is known as being in irons , which is embarrassing, but every sailor has experienced it, whether or not they'll admit it is another story. Being in irons is easily remedied: when the boat is blown backwards you will be able to steer, and as the bow is pushed off the wind you will achieve an appropriate angle to the wind to sail.
- Point the tiller in the direction you wish to go and tighten the jib sheet to windward, ( backwinding the sail ). The wind will push the bow through the wind. Once you've completed your tack, release the sheet from the winch on the windward side and pull in the sheet to leeward and you'll be on your way again.
- Because speed is so easily lost when tacking, you'll want to perform this maneuver as smoothly and quickly as possible. Keep tacking back and forth until you get to your destination.

- Reefing almost always needs to be done before you think you need to!
- It's also a good idea to practice capsize procedures on a calm day too. Knowing how to right your boat is a necessary skill.

Storing the Sails

Community Q&A
- Try learning to determine the wind direction using your ears. Let the wind blow onto your back, then slowly turn your head left to right and back until you feel it "equalize" over your ears. Once you find that point, you now know the wind direction, and using this method, you can understand the wind more without having to use your eyes. [7] X Research source Thanks Helpful 2 Not Helpful 0
- Know how to read clouds and the weather they may bring. [8] X Research source Thanks Helpful 2 Not Helpful 2
- If something bad happens—too much wind, man overboard, etc.—remember that you can bring the whole thing to a halt simply by pulling all three sheets out of their cleats or off their winches. The boat will (mostly) stop. Thanks Helpful 3 Not Helpful 0

- Going overboard is a serious matter, especially if you are alone. Cold water, currents, and other boats all can account for serious dangers, and if the sails are up, the boat will take off much faster than you might expect. Additionally, many boats float so high on the water ( freeboard ) that it is difficult to climb in or haul people in without assistance. When sailing at night, always wear a shoulder-mounted flashlight and strobe emergency signaling device, which makes it much easier for a SAR (Search And Rescue) crew to spot you in the water. Thanks Helpful 36 Not Helpful 4
- In sailing, your very life may depend on doing things before they need to be done, when they first cross your mind. If you wait until it needs to be done, it may be too late or very difficult. Follow your instincts. Thanks Helpful 30 Not Helpful 5
- Remember the old maxim "It's better to be on the dock, wishing you were on the lake, than to be on the lake, wishing you were on the dock". Don't let enthusiasm overcome your good judgement on a day you should not go out. The apparent wind while tied alongside at the dock may be very different out on the water. Many novices (and experienced sailors, for that matter) get into trouble venturing out when there is too much wind to sail safely. Thanks Helpful 4 Not Helpful 0
- It is highly recommended that you at least have working knowledge of the nomenclature of the boat and have done some reading of in-depth material before attempting this sport yourself. Some highly recommended reads are: The Complete Idiot's Guide to Sailing , Sailing for Dummies , and Sailing the Annapolis Way by Captain Ernie Barta. Thanks Helpful 2 Not Helpful 1
- Know how how to use VHF radio to make a Mayday call from a Marine Vessel . In an emergency, it is usually the quickest way to summon help. Cell phones may be used, but VHF will be able to contact a nearby vessel much more quickly should you need assistance or be able to render same. [9] X Research source Thanks Helpful 2 Not Helpful 0
Things You'll Need
- A life vest (Personal Flotation Device) is mandatory on all boats for all passengers. (A pealess whistle attached to the PFD is an excellent idea!) You should wear one at all times. If you have children with you, they should wear one even when you are at the dock.
- Every vessel, regardless of length is required to have a certain amount of safety gear aboard. This ranges from an anchor with sufficient rode, flares, and other equipment as may be mandated by the Government. These regulations are for your safety and should be adhered to.
You Might Also Like

- ↑ http://www.lovesailing.net/sailing-theory/sailing-basics/parts-of-a-boat/parts-of-a-boat.php
- ↑ https://www.boats.com/resources/sailing-101-sailboat-types-rigs-and-definitions/
- ↑ http://www.discoverboating.com/resources/article.aspx?id=243
- ↑ https://www.uscgboating.org/images/486.PDF
- ↑ https://www.cruisingworld.com/learn-to-sail-101#page-2
- ↑ https://www.discoverboating.com/resources/how-does-a-boat-sail-upwind
- ↑ https://www.dummies.com/sports/sailing/finding-the-winds-direction/
- ↑ https://weather.com/news/news/read-clouds-meteorologist-20130826
- ↑ https://www.boatus.org/marine-communications/basics/
About This Article

To sail a boat, start by performing a detailed visual check of the cables and ropes that support the mast. Next, determine the wind direction by referring to the wind direction indicator at the top of the mast, then point the boat into the wind. Secure the bottom front of the mainsail and jib to the shackles on the boom and bow of the boat, then trim the jib sheets and mainsail before letting out the main sheet! For tips on monitoring wind indicators, read on! Did this summary help you? Yes No
- Send fan mail to authors
Reader Success Stories
Sep 13, 2017
Did this article help you?
Tobias Tanti
Dec 25, 2020
Nov 19, 2017
Mar 30, 2016
Nov 22, 2016

Featured Articles

Trending Articles

Watch Articles

- Terms of Use
- Privacy Policy
- Do Not Sell or Share My Info
- Not Selling Info
Get all the best how-tos!
Sign up for wikiHow's weekly email newsletter
Service Locator
- Angler Endorsement
- Boat Towing Coverage
- Mechanical Breakdown
- Insurance Requirements in Mexico
- Agreed Hull Value
- Actual Cash Value
- Liability Only
- Insurance Payment Options
- Claims Information
- Towing Service Agreement
- Membership Plans
- Boat Show Tickets
- BoatUS Boats For Sale
- Membership Payment Options
- Consumer Affairs
- Boat Documentation Requirements
- Installation Instructions
- Shipping & Handling Information
- Contact Boat Lettering
- End User Agreement
- Frequently Asked Questions
- Vessel Documentation
- BoatUS Foundation
- Government Affairs
- Powercruisers
- Buying & Selling Advice
- Maintenance
- Tow Vehicles
- Make & Create
- Makeovers & Refitting
- Accessories
- Electronics
- Skills, Tips, Tools
- Spring Preparation
- Winterization
- Boaters’ Rights
- Environment & Clean Water
- Boat Safety
- Navigational Hazards
- Personal Safety
- Batteries & Onboard Power
- Motors, Engines, Propulsion
- Books & Movies
- Cockpit Confessions
- Communication & Etiquette
- Contests & Sweepstakes
- Colleges & Tech Schools
- Food, Drink, Entertainment
- New To Boating
- Travel & Destinations
- Watersports
- Anchors & Anchoring
- Boat Handling
- ← Install & Repair
Create Your Own Wiring Diagram
Advertisement

Photo: Ed Sherman
Whether you want to install a new stereo system or trace an intermittent electrical fault, a wiring diagram will save you hours of aggravation. The older your boat, the more likely you are to have either no wiring diagram or one that's worse than none because it's inaccurate. Making your own isn't rocket science, but it does take time, patience, and care. You won't get it all done in a day — or even several weekends — and don't let yourself get intimidated by complex electrical diagrams. Start by focusing on the simpler (and safer) 12-volt DC system aboard your boat. With each wire you trace, and circuit you complete, it gets easier. Eventually you'll have a map of your entire electrical system and a thorough understanding of how the pieces are tied together.
On many boats there are two types of current: alternating (AC) and direct (DC). Serious damage and even electrocution can result from confusing the two. In recently built boats, the two systems should be clearly differentiated and separated, including at the electrical panel. Wires and components associated with each should be distinct and, on newer boats built to American Boat and Yacht Council (ABYC) standards, will use standard color-coding. See chart at below.
| Color | Use |
| Green or green and yellow stripe(s) | DC grounding conductors |
| Black or yellow | DC negative conductors |
| Red | DC positive conductors |
AC wiring for 110 volts usually has white for neutral, black for hot, and green for ground (220-volt AC lines have a second hot wire, colored red). Those three wires typically are enclosed in white or gray insulation. You'll see the colored individual wires when they exit the common sheathing at each end. Your diagram should have one line for those three enclosed wires, except as necessary to differentiate them at the ends.
The wiring colors on your boat may be very different, especially if it's older and there's been a lot of "jury rigging" in its past. Make no assumptions about which wires do what. Trace each wire in the circuit from the electrical source to its use. Wire colors will assist you in doing that, even if they don't follow ABYC standards, by helping you identify the far end where it reappears from a conduit or a locker on its way to the equipment it powers.
On boats with both AC and DC systems, the DC system is generally simpler. DC power originates from the battery banks, so there is only one source. The DC electrical system is grounded through the negative bus of the distribution panel, which in turn is grounded through the engine negative terminal or its bus. That means that only two wires run from the distribution panel to each consumer of DC power — a DC positive and a DC negative — versus the three or four wires for each AC electrical user. The simplicity of the DC system, along with its relative safety in comparison to AC, makes it a good place to start.
Tip: Be very careful; don't confuse black DC negative wires on older boats with hot black wires on an AC circuit.
Big Picture: Sources & Uses
Take a careful look at the electrical systems on your boat, listing sources and uses for both AC and DC current. If it runs without the inverter when only battery power is available, it belongs on the DC list. A general idea of how each is connected will help you anticipate what to draw. If you have a good wiring diagram, copy it and blow it up so that you can make clear notes and changes in the future. Anytime you change the wiring or electrical components, write it on the diagram. If you don't have a good diagram, or you're intimidated by the arcane electrical symbols on the one you have, make one from scratch using large paper.
Starting with the batteries, follow the wires through to the end users, noting the selector equipment and any other equipment in line. Some people draw the wires within a sketch of their boat to indicate where they are. In a complex boat, this may ultimately be more confusing than drawing them in abstract and using industry conventions to show electrical components (see Online Extra). Start simply and make sure you know what you're drawing. Use a sharp pencil and try to avoid erasures. As you gain understanding and confidence, you'll likely redraw it several times. Indicate wire colors and gauges (thickness). The lower the gauge, the thicker the wire and the more current it can carry. The gauge should be imprinted on the insulation, with the number followed by "AWG," such as "12 AWG."
Using the list you made for the DC side, match up the breakers on the panel to the DC users. A few stragglers aside, the diagram of your DC system should come into focus. But don't jump ahead and make assumptions. All too often, a circuit breaker will have been reassigned in some past renovation, or a previous owner will have spliced into a wire to obtain power for an added item such as a fan. The only way to figure that out is to trace each wire to see where it really goes.
Tracing A Wire
After getting a basic understanding of your DC system, it's time to get down and dirty. First turn off all sources of power. Unplug from shore power, turn off any inverter and disconnect it from the battery, disable the generator, and remove the positive DC wires from the batteries. Although you're working on DC circuits, these actions will disable the AC side in case you mix up the two. Even after you've done this, DO NOT assume it's safe to touch any exposed wires, terminals, bus, etc.
Start at the source and trace each wire through to its end. The primary source wires will be heavy-duty wires running from your batteries to a distribution panel, or on smaller boats, a busbar. These wires should be few and simple, and much heavier gauge than the ones coming out of the panel/busbar because they supply the current for all those smaller wires. They may run through a selector switch before the panel.
The busbars or circuit breaker panels are the secondary source for most of your wiring, where the current "spreads out" following myriads of smaller wires to all the users on the boat. Hopefully your panel will have labels at the breakers, giving you some idea where these wires go. You may have to cut wire ties to isolate a particular wire contained in a tight bundle. Remember to re-tie the bundles when you're through. The wire you're tracing will often lead into a hole or conduit, but its color should distinguish it at the other end. If not, position a helper where you think the wire exits. Pull or carefully tug on your end, and hopefully your helper can see it moving. If not, try pulling back and forth like a seesaw.
If you just can't trace a wire, use a volt-ohm meter (VOM) to check for continuity (see "Five Ways To Use A Digital Multimeter," Dec. 2013). If you get continuity, you know in theory that the wire coming out of the hole is the same one going in. In some cases, wires going to certain equipment can indicate "ghost continuity" because of ground connections or other features. Physically tracing the wire is the most accurate method, especially on older boats. Once you've identified a wire from its source to its use, you can label it and add it to your wiring diagram.
Labeling And Diagramming
Attach labels to the wires at each end and at appropriate spots along the wire run. This helps when troubleshooting later. Buy labels or use high-quality yellow or white electrical tape and write on it with a quality indelible marker. Oil, grease, and other fumes in the boating atmosphere can cause the glue on labels or even good electrical tape to dissolve.
It's usually best to wrap the tape entirely around the wire, sticking it to itself. Office supply labels for label printers look neat but I've found that the glue on the back seldom lasts long and the labels end up in the bilge. Also label the wires and components on your diagram. You'll probably have to list and number these labels off to the side with a corresponding encircled number at the component. This avoids diagram clutter.
As you trace wires, look carefully for problems, including chafed insulation, hot spots indicated by browned or blackened insulation, little bumps in the insulation (indicates corrosion or overheating inside), a burnt insulation smell, or corroded terminals. Note the problems and fix them before you use the boat again. If you find an unfamiliar component, such as a diode, shunt, or transfer-solenoid switch, ask someone or research the part until you know what it does. This isn't just for accuracy; it will educate you, enabling you to diagnose problems more easily.
In older boats you might find dead wires, where an owner has removed something and disconnected (hopefully) its supply wire at the panel, but left it behind "just in case." Should you take it out, leave a strong nylon messenger string in its place to pull through another wire later. If you leave the wire, label it at both ends and be certain it's dead. Seal each end by wrapping it with electrical tape and then smear electrician's "liquid tape" over the actual tape to keep moisture out and the tape in place.
Voilá! The Final Product
By the time you get through diagramming the DC system, you'll have a good sense of how you want your wiring diagram to look. This is a good time to redraw it before starting on the AC system. AC systems can have more than one source (shore power, generator, inverter). If yours is particularly complex, consider hiring an ABYC-certified tech for an hour or two to walk you through it. Your diagram should clearly differentiate between AC and DC, or you can do a separate diagram for each system. Label which is which and make it obvious where the two types of current run close to, or could be confused with, each other. Make at least one copy to keep off the boat, and store your onboard diagram in a waterproof container such as a Ziploc bag. If it's very large, roll it up in a PVC pipe with two end caps. Glue one on, and use the other as a removable cap.
Diagramming your electrical system is a great winter project, and will be invaluable when you want to install something new.
Example Of A Draft Wiring Diagram For A Simple Boat
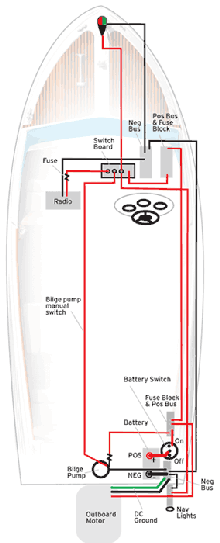
- When you make your own wiring diagram use very large sheets of paper for clarity.
- Most boats will have positive and negative busses where area wires come together.
- Equipment coming off a switchboard or circuit panel should be straightforward to trace.
- On a small boat, sketching circuits in the boat outline helps you locate wires later.
- The next step would be to trace the wiring to the instrument cluster and related gauges.
- Start with large cables leading from the batteries to the selector switch/busses.
Related Articles
The truth about ceramic coatings for boats.
Our editor investigates the marketing claims of consumer-grade ceramic coatings.
Fine-Tune Your Side Scan Fishfinder
Take your side-scanning fishfinder off auto mode, and you’ll be spotting your prey from afar in no time
DIY Boat Foam Decking
Closed-cell foam flooring helps make boating more comfortable. Here’s how to install it on your vessel
Click to explore related articles
Technical Editor, BoatUS Magazine
One of the top technical experts in the marine industry, Tom Neale, BoatUS Magazine Technical Editor, has won nine first-place awards from Boating Writers International, and is author of the magazine’s popular "Ask The Experts" column. His depth of technical knowledge comes from living aboard various boats with his family for more than 30 years, cruising far and wide, and essentially learning how to install, fix, and rebuild every system onboard himself. A lawyer by training, for most of his career Tom has been an editor and columnist at national magazines such as Cruising World, PassageMaker, and Soundings. He wrote the acclaimed memoir All In The Same Boat (McGraw Hill), as well as Chesapeake Bay Cruising Guide, Vol. 1. These days, Tom and his wife Mel enjoy cruising their 2006 Camano 41 Chez Nous with their grandchildren.
BoatUS Magazine Is A Benefit Of BoatUS Membership
Membership Benefits Include:
Subscription to the print version of BoatUS Magazine
4% back on purchases from West Marine stores or online at WestMarine.com
Discounts on fuel, transient slips, repairs and more at over 1,200 businesses
Deals on cruises, charters, car rentals, hotel stays and more…
All for only $25/year!
We use cookies to enhance your visit to our website and to improve your experience. By continuing to use our website, you’re agreeing to our cookie policy.

Parts of a Boat (Illustrated Diagram of a Boat’s Anatomy)
Posted on Published: April 13, 2022 - Last updated: June 13, 2022

Just like a car or truck or animal, there are many parts of a boat, all of which are unique to a boat. When you start boating, it’s a good idea to become familiar with boat anatomy and terms. Not only does it save you from looking like an amateur but it can be a safety issue.
The parts on a boat may vary by boat type. For instance, not all boats have a flybridge. That’s unique to certain types of boats . Below is our extensive series of diagrams setting out the main parts of a boat. We use a series of different types of boats and angles to aid understanding. Below our diagram, we expand on the specifics.
Related: Aluminum vs. Fiberglass Boat | Boat Accessories | Where to Buy Used Boat | Hewescraft 180 Pro V Review | Renting a Boat Slip | Types of Boats | Boat Cost | Hard vs. Soft Top vs. Hybrid vs. Semi Top Boat | Buying a Boat | Parts of a Boat Trailer

Parts of a boat explained
- Bow: the front of a boat.
- Stern: the rear of a boat.
- Port: left side of a boat.
- Starboard: right side of a boat.
- Helm: the driver’s seat.
- Gunwale: the top of the boat’s side (upper edge). If water comes higher than the gunwale, it enters the boat.
- Transom: The cross-section of the rear of the boat (stern).
- Pilothouse: Enclosed cabin for driver and passengers. Not all boats have a pilothouse.
- Cleats: Protruding knobs for tying up boats.
- Fenders: Act like bumpers to protect a boat against a dock or next to another boat. Prevent the boat from bouncing into anything solid. Because I keep my boat at a marina slip with a dock on one side and boat on the other, I have four fenders (two for each side). If you keep it at a dock only, you only need two (or more if a longer boat).
- Flybridge: Open area with additional helm on top of a boat’s cabin. Often includes seating for passengers. Found on cabin cruisers, convertible boats and yachts.
- Handrail: Railing on top of the gunwale.
- Beam: The full width of a beat.
- Freeboard: The distance from top of the water (waterline) to the gunwale (the point where water could flow into the boat).
- Draft: The distance from boat’s waterline to bottom (keel) of the boat. This is the shallowest the boat can enter. If propeller drops below the keel, either need to stay in deeper water or lift the motor up.
- Keel: the lowest point of the hull.
- Bilge: The very bottom of the boat. Water often collects in here which requires pumping out. If water fills the bilge it runs the risk of sinking.
Are there other boat parts?
There are for specific types of boats such as a sailboat. Sailboats have many additional parts and are more complex because of the sails. Ships also have many more parts to them as they are large and much more complex vessels. The above boat anatomy diagram is to set out the parts of a boat commonly found on most boats.
Why don’t you include boat accessories, especially required boating safety accessories?
Boat accessories are not standard parts of a boat. I’ve now bought a ton of boat accessories for our boat. Many are required to have on board (life jackets, fire extinguisher, whistle, manual bailer, etc.) but still, they are not part of a boat. Check out our extensive boat accessories article for tons of ideas to make your boat safer and more fun.
Where can you learn about boating including boat anatomy, safety and navigation?
Where I live, all boat operators must have a boating license. To get the boat license, we must take a course first. I took the BoaterExam course which was excellent. I passed the boat exam on my first try. In fact, I sailed through it. We were given 75 minutes for the exam. I had it done in 20 minutes.
Can you take boat operation lessons?
If you live near the ocean in a populated area, chances are there are powerboat classes and courses you can take where they instruct you on the water. I live in Vancouver and there are such options such as Cooper Boating . In the US, check out the USPowerboating website for course locations and options. Generally, there’s more instruction available for sailing than powerboat operation just because sailing is much more difficult to learn.
What about the parts of a boat trailer?
While tightly related to the parts of a boat, we decided to publish a separate article setting out the parts of a boat trailer here .

| Everything Boat Building Don't tell me that I can't. Tell me how I can. | ||
|
| ||
| I am not a spokesperson for the US Coast Guard or ABYC. For an official interpretation of regulations or standards you must contact the US Coast Guard or other organization referenced.. | ||
| or; Contact and the to get the latest standards for Electrical systems. Info about ; Or go to the Basic Electricity Pages below. | ||
| | ||
14 Steps To Wiring Your Boat
What you need to know to install or re-wire the electrical system on your boat. a step-by-step practical guide. covers planning, diagrams, wiring, batteries, over current protection and more..
I want to thank Ed Sherman for reviewing this page for accuracy.
A question often asked on boating and boat building forums, and by visitors to my web site, is: “I need a simple wiring diagram for a small outboard boat to wire up the lights and few other things, but no one seems to have one. Is there one, and where can I find it? Are there a set of step-by-step instructions?”
There are wiring diagrams, websites and forums that tell you how to wire an electrical system for large boats and bigger sailboats. But when it comes to small boats there is a distinct lack of information and diagrams for how to install a simple, safe, and reliable electrical system.
The following is meant to apply only to small outboard boats under 16 feet with 50 or 60 horsepower or less. It can be applied to slightly larger boats that have a simple 12V DC system using one or two 12V batteries.
Note 1 : I will not deal with the wiring specifically for the outboard motor and controls. Here is a web site where you can obtain wiring diagrams for most outboard motors. Most new outboards come with a wiring harness and a manual that has wiring diagrams. See Master Tech Marine Outboard Wiring Diagrams .
Note 2: If you are re-wiring a boat with an electrical system installed: Don't rip out that old system yet ! Use the old system to help make a plan in steps 1 through 7. Trace out each wire and put that on your diagram. This will make it far easier to locate wires and equipment. Wait until you actually start installing wiring in step 12. Then replace each set of wires with new. This may take a little more time, but will result in far fewer mistakes and less troubleshooting.
Note 3: Throughout this I will give references to the US Code of Federal Regulations (CFR) requirements that apply to boat manufacturers, and to the American Boat and Yacht Council industry standards. Examples: 33 CFR 183.401, or ABYC E-11. The US Coast Guard Regulations (the CFR) and the ABYC standards are good guidelines to follow for a safe and reliable electrical system. They are used by marine electricians, professional boatbuilders, designers, marine surveyors, and marine repairers. If that’s how the pros do it, so should you.
Step 1. Make a Plan. Decide what you want to install, and where it will go. See Electrical Planning
Step 2. Draw a simple electrical schematic (diagram) that shows each piece of equipment, the fuses, switches, and how all of this will be connected. This is not a diagram of where the equipment is located on the boat. That will come in Step 8. It is simply a diagram of the electrical circuits. Here are two alternative examples. (Click on the diagram to expand.) The first diagram uses a positive buss bar. The second omits the positive buss bar. For clarity I did not use color codes except red (positive) and black (negative).
Do not be concerned if you don’t know electrical symbols. Just make a box or circle and write in what it is, or you can use a picture of the item. As long as you understand what goes where, and how they are connected, it’s Ok. Remember, any 12V DC device must have at least a positive and negative wire connected to it. Put a plus or minus next to the wire or use red for positive and black for negative. On metal boats do not use the hull as a return (negative) path. Connecting your electrical system to a metal hull can result in stray current corrosion.
See also BoatUS diagram:
There are several ways to draw wiring diagrams. The most important thing is that you understand what you are diagraming. It needs to be simple enough and clear enough for you to be able to refer to it in the future and still understand what each item is, what the wiring is and how each item of equipment is connected to the electrical system. That way, in the future if you want to add or subtract equipment you can do so by referring to your diagram and determining where and how the new item fits into the system.
Step 3. Batteries: Decide where you will put the battery. Later we will decide the capacity and type of battery but for now we only need to decide where to put it.
The battery is the source of power for starting, instrumentation, and lighting. There may be a second battery on some boats for running a trolling motor or other equipment.
Batteries should not be too close to anything that can cause an accidental short. There should be 12 inches of space all around them. Batteries must not be directly under or over fuel lines or under other electrical equipment such as a charger or inverter. If they are, there must be a floor or panel separating them. ABYC E-10.7.5 and 10.7.6 Storage Batteries
Batteries need to be in a space that is ventilated to the atmosphere. 33 CFR 183.420(e) This applies to all batteries, not just lead/acid batteries.
Batteries must not move, so they have to be fastened down. 33 CFR 183.420(a)
There should be a tray under a battery for spilled electrolyte, or it should be in a battery box, and fastened down so it won’t move under any conditions. (ABYC E-10.7.2) The Coast Guard does not require a tray or a battery box but ABYC does require some means to contain spills. If it is strapped down in a tray, spilled acid won’t damage the boat and the battery won’t move. The terminals need to be covered with a boot or some other device that protects them from accidental contact with metal tools. But, if the battery is in a box the terminals are protected against accidental contact with tools, spills are contained, and it won’t move.
| | |
The battery should be close to the engine. Since starting current is so high, and the wires to the starter are not fused, you want to keep the wires as short as is practical.
The battery should be a combo starting/deep cycle battery, usually sold as a marine battery. An auto battery would do for starting and lights. But, for running a radio, and other electronics while anchored or fishing, a battery with a little deep cycle capacity is needed so the battery doesn’t go flat and leave you stranded when you try to restart the engine.
How big a battery (capacity, not physical size) do you need? That depends on the amount of load on the battery. I will show how to determine that in Step 12.
There is one non-electrical consideration; weight. Lead acid batteries can weigh up to 50 lb. Think about how the weight of the battery will affect weight distribution on your boat, especially if it is on the same side as the helm and controls. You may have to move it to balance the boat side to side. If you have a very low transom, how will the weight of the battery affect the water line at the transom?
Step 4. Battery Switch: Some people think that a battery switch is not necessary on a small boat. I think a battery switch is necessary to turn everything off when you are not using the boat.
Where the battery is located determines where the battery switch goes. It should be close to the battery but easily accessible to be switched off in an emergency. ABYC E-11.6.2.
A good brand is Perko but there are others. Avoid any battery switch that is not UL Marine Listed. There are cheap ones on the market that are not UL listed and can get hot and melt.
A battery switch must be ignition protected. (33 CFR 183.410)
Ignition protection means that it will not ignite gas fumes if they are present. This is extremely important if you have a gasoline fuel tank in the same compartment as the battery.
Use only ignition protected electrical components. You don't want anything in there that will set fuel vapors off. Batteries are not considered a source of ignition because there are no moving parts, but if you make accidental contact with metal tools it can create an arc. So, the terminals must be protected, and battery switches and other electrical equipment in this compartment must be ignition protected.
Buy a switch that has a provision for two batteries because you may want to add a battery in the future. The switch will have three positions. OFF, 1, 2, and BOTH. The 1 position connects the one battery and allows charging of that battery when the engine is running (if your outboard is large enough to have an alternator). The 2 position connects and charges the second battery, if there is one, and the BOTH position puts the two batteries in parallel doubling the battery capacity and charging both at the same time. You won’t need the BOTH and 2 positions now, but this gives you the option to add a second battery.
Step 5. Fuses: Next, install a fuse block close to the battery switch. Fuses must be within seven inches of the source of power (33 CFR 183.455) but you can go up to forty inches if the wire is sheathed. Standard wire loom is fine as a sheath. Be aware, the fuse is there to protect the wire, not the equipment. If you overload wiring it gets hot, melts and starts a fire. We will determine the size of the fuse later. See Step 12. Buy a fuse block with two fuse holders. That way you have a spare if the fuse blows. This is generally a good idea. When installing fuse blocks get ones with more fuse holders than you think you need. You will need them eventually. One or two extra fuse holders is good.
Step 6. Equipment Location: Determine where each piece of equipment will be.
Think about where you want things to go. Depth finders need to be where they are easy to see, but not blocking your vision when operating the boat. Radios should be where they can be easily reached, and for VHF, reach the mike. The back of the console or surface you are mounting them on needs to be easily accessible for access to the wiring.
Step 7 . Locate the fuses, buss bars and switch panels.
Decide where to put fuse boxes, buss bars, switch panels, etc. Each of these must be close to the equipment they power, and easily accessible to be worked on. They cannot be hidden behind equipment or inaccessible panels. This may sound obvious, but I have seen some very bad installations. Also, they should be protected from spray or rain.
Most electrical and electronic equipment comes with pigtails. Pigtails are wires coming out of the equipment and may only be a few inches to several feet long. Sometimes they have a connector attached to the ends of the wire. When determining where stuff goes consider the length of the pigtails, because you don’t want a rat’s nest of wires hanging loose.
Switch boxes: A box or panel where switches can be mounted to control stuff. On a small outboard boat this is usually the dash or the console.
Fuse block: A panel with fuse sockets on it. It can be open or covered.
Buss bar: A block with studs for connecting wires.
| A Battery Switch | FuseBlock | Buss Bar |
Typical Buss Bar: This buss bar is for the negative wires. The large wire on the left is the battery negative.
There are some devices that are connected directly to the source of power and do not go through fuse blocks and switches. They need to always have power. One is the bilge pump. Bilge pumps may have a float switch that automatically turns the pump on when water in the bilge gets to a preset height. This won’t work if the pump is not wired directly to the battery. It is not good practice to wire it directly to the battery though. Wire it to the power input side of the battery switch. It is good to install a switch at the helm that turns the pump on manually.
If your boat has an anchor light, you may also want to wire the switch for the light directly to the power input side of the battery switch. That way you can turn on the anchor light when the battery switch is off.
Step 8. Make a diagram of the boat showing where the wiring, equipment and fuse blocks will be located.
Make a rough drawing of the boat looking down from the top. This is called a general arrangement and shows how the boat is laid out. Using your electrical schematic, put in where the equipment, fuse boxes, buss bars, switch boxes and wiring are going to go. Check this against the actual boat to make sure you aren’t missing something.
Wiring cannot go through pieces of equipment, pipes, tubes, and other solid objects. They can go through walls and bulkheads and panels. Wiring must be easily accessible for installation, trouble shooting and replacement. It must be fastened down at least every 18 inches (ABYC 11.15.4.1.9) so it isn’t rubbing or chafing on something. Where wiring goes through a bulkhead, wall or panel, it must have a grommet or padding to protect the wire. 33 CFR 183.445(a)
Your diagram may look something like this; (Click on image to expand)

Step 9. Wiring: Figure out how much wire you need, what size wire you need, and what color it should be. Wire standards.
What about the wires from the battery switch to the starter? The wire needs to be a very heavy gauge, at least a 4 AWG on small outboard boats, because starters draw a lot of current. Both the positive and negative wires should be the same size. If the outboard has the wires for the starter already installed, the wires from the battery to the switch should be the same size as those wires. The engine manufacturer has determined the amount of amperage the starter draws and correctly sized the wires for the load.
The positive wire (red) goes from the battery to the input side of the battery switch. The negative (black) wire goes to a buss bar. One post on the buss is for the wire from battery to the engine block (ground). Another wire goes from the buss up forward to the dash. The others are for other equipment. There should be as many terminal posts as you need plus a few extra.
Color Codes: The positive wire should be red. Negative can be black, or yellow, or black with a yellow stripe. Throughout the boat negative wires should be black or yellow or a combination. AT the dash or console, all positive wires from the fuse block to the instruments and the equipment, should be color coded using the standard color codes for marine wiring. Direct Current Color Codes: From ABYC E-11.15.2.3 Table 11 and Table 12.
Direct Current Color Codes: From ABYC E-11.15.2.3 Table 11 and Table 12.
| Green | DC Grounding Conductor | Bonding Wires (insulated) |
| Yellow or Black | DC Negative Conductor | Negative Mains |
| Red | DC Positive | Positive Mains |
| Yellow/Red | Starting Circuit | Starting Switch to Solenoid |
| Brown/Yellow | Bilge Blowers | Fuse or Switch to Blower |
| Dark Gray | Navigation Lights | Circuit Breakers or Switch To Lights |
| Dark Gray | Tachometer | Tachometer Gauges and Senders |
| Brown | Generator Armature | Generator Armature to Regulator |
| Brown | Alternator Charge Light | Generator Terminal or Alternator Aux Terminal to Regulator |
| Brown | Pumps | Circuit Breakers or Switch to Pumps |
| Orange | Accessory Feed | Amp Mtr to Alt or Gen Output Acc Circuit Breaker Switches |
| Orange | Common Feed | Distribution Panels To Accessory Switches |
| Purple | Ignition | Ignition Switch to Coil Electrical Instrument |
| Purple | Instrument Feed | Distribution Panel To Electrical Instruments |
| Purple | Main Power Feed | Positive Mains (particularly un-fused) |
| Dark Blue | Cabin and Instruments | Circuit Breakers or Switch to Lights |
| Light Blue | Oil Pressure | Oil Pressure Gauges & Senders |
| Tan | Water Temp | Water Temp To Sender To Gauge |
| Pink | Fuel Gauge | Fuel Gauge Sender to Gauge |
| Green/stripe | Tilt Down/Trim in | Tilt and Trim Circuits |
| Blue/Stripe | Tilt Up/Trim Out | Tilt and Trim Circuits |
Color codes tell you what the wire is for. But label the wire on both ends. A simple piece of tape with a name written on it will do. They do not need to be fancy labels, but if you prefer, you can buy labels at electrical suppliers or hardware stores.
Wire must be marine wire. (33 CFR Sec. 183.435) Do not use auto wire. It is not made to the same standards as marine. Most marine wire is labeled UL 1426. It must be copper stranded wire. It does not have to be tinned, although tinned wire will last longer. On a small boat it is not necessary. Do not scrimp on wire though! Cheap wire could mean the difference between a reliable system and one that you constantly have trouble with. Buy good quality wire. I have seen 100 ft spools of Ancor 16 AWG Tinned Marine Wire for sale on-line for as little as $24.00 USD.
What size wire? American Wire Gauge (AWG) is in reverse order. The larger the number, the thinner the wire. The thickest wires are 00 or 0 AWG. The smallest gauge allowed on boats for a single wire is 16 AWG, or 18 AWG if it’s in a bundle or sheath (33CFR 183.425), but this may be way too thin for the equipment or the length of the wire run. The only exception to this is wire inside electronic devices or part of the electronic controls on the engine. 33 CFR 183.425(g)
The thicker a wire is, the less resistance it has. The longer a wire, the more resistance it has, and so there is a larger voltage drop. You want to minimize the resistance and the voltage drop. So you first need to figure out the wire size based on how many amps are being used, and then by how long the wire is. Use the tables in Appendix A, at the end of this page, to determine the correct size. Don't just guess at wire size and buy larger diameter wire such as 14 or 12 AWG. See Wire Size:
For the purpose of determining wire size, the fuse block the wire is coming from is considered the source of power. For the wires running from the battery to the starter, or to the under-dash fuse block, the battery is the source of power. In the two examples below the fuse block under the dash or console is the source of power.
Here is an example:
A Hummingbird Model 345C depth sounder draws 380ma (milliamps from the specifications). The installation includes a 6 foot power cable of 18 AWG wire. This may be fine for connecting it to a fuse block near the dash. But we need to size the cable running from the battery to the dash. It is going to be at least 10-12 feet long on a 16 foot boat. Double that length for the negative return wire.
Use table 3 in The Appendix for voltage drop. Most boat manufactures use wire rated for 105C (degrees Celsius - the temperature rating of the insulation on the wire). Looking at the table under the column for 105C we see amperages starting at 20 amps, 25 amps, 30 amps, and so on. Following the row for 20 amps to the left column we find 18 AWG.
From the table on voltage drop an 18 AWG wire 20-24 feet long (30 feet in the table) with a 15-ampere load will have less than a 10% voltage drop. But it can only be 18 if it’s in a sheath or bundle. So go up one size to 16 AWG.
Another Example:
Suppose I have three electronics running off a fuse block in the dash or console. Each piece of equipment requires 1 amp at 12 volts to run. The total amperage for the three items is 3 amps. From the fuse block in the dash or console to each item of equipment, there is a positive wire from the fuse to the equipment, and a negative wire running back to the buss. Using 1 ampere, we determine the size the wire should be, by using table 1 and 3 in Appendix A. For instance, if the positive wire is two feet long then the total length of positive and negative wires is 4 feet. Looking at the Table 1, the line for 18 AWG wire at 105C allows up to 20 amps.
So, we could use 18 AWG. Look at Table 3. We see that an 18 AWG wire, 10 feet long, will have less than a 10% voltage drop for up to 5 amperes. Again, we could use 18 AWG but since 18 AWG wire has to be in a bundle or a sheath we add a level of safety by using 16 AWG.
This is done using the tables developed by the US Coast Guard and ABYC. You don’t have to know any formulas to figure it out. The first table determines the wire size based on the load in amps and the second table the size depending on length and voltage drop. You use the larger wire if there is a difference.
See the table in Appendix A at the bottom of this page. or ELECTRICAL TABLE: 33 CFR 183.42: ALLOWABLE AMPERAGE OF CONDUCTORS FOR UNDER 50 VOLTS or: ELECTRICAL SYSTEMS VOLTAGE DROP
Step 10. Wiring tools. Wire connections (terminals). See Connectors :
Tools: Use good quality tools, especially good quality crimpers and wire strippers. Cheap crimpers make bad crimps. Bad crimps make bad connections. Poor wire strippers nick the metal conductor which may cause the wire to break or have a high resistance. See My Page on Practical:
Wire terminals must be used . Connections should never be a bare wire wrapped around a stud or post. This is bad practice, and can easily come loose or result in a high resistance connection. High resistance equals heat, which results in fire. Never use wire nuts to connect wires on a boat! They are prone to vibration and corrosion. ABYC E-11.15.3.7 Twist-on connectors (i.e., wire nuts) shall not be used.
Use crimp type ring or captive spade terminals. Captive spade terminals have a tang on the ends. This prevents them from being pulled off or slipping off the stud or post. Connections must resist being pulled off. In the ABYC wire standard there is a table listing how much of a pull they must withstand depending on the size of the wire. A 16 AWG wire must withstand a ten lb. pull. A 4 AWG wire must withstand a 70lb pull.
You can solder connections if you like but crimp them first . ABYC standards do not prohibit soldering, but they do not allow soldering to be the sole source of support for the connection. (ABYC E-11.5.3.8) This is because solder creates a hard spot in the wire which is not as flexible as the wire itself and not as resistant to flexing and vibration. So, if you solder you must also crimp. Crimp first, then solder.
Seal wire connections with a good waterproof sealant , usually marketed as dielectric grease. There is no requirement to do this, but it prevents water from getting in the connection and wicking up the inside of the wire insulation or corroding the connector.
My method. I do not solder. First I slide a short length of heat shrink tubing onto the wire. https://en.wikipedia.org/wiki/Heat-shrink_tubing How long it is depends on the wire and connector size. Usually if the tubing extends about 1/2 inch (1 centimeter) beyond the end of the connector, that is enough. Then I use dielectric grease. See Wikipedia on Dielectric grease . Dielectric grease is non-conductive grease, usually silicone that is also waterproof and can be used to seal connectors. Before crimping the wire in the connector, I squirt a little dielectric grease into the connector where the wire goes. I then insert the wire and crimp it. Then I slide the tubing down over the connector and shrink it with a heat gun or hair drier so it seals itself around the wire and connector. The combination of grease and heat shrink tubing should keep the water out.
Heat Shrink Tubing And Connectors, AAA protection, How to install and repair. http://youtu.be/jCRsx38WRw8
How to get a good crimp: Marine How to: Wire terminations: https://marinehowto.com/marine-wire-termination/
Step 11. Fuses . How big should your fuses be?
Fuses are rated by amperage and protect the wire from overheating and fire. Fuses must be rated at the same or less rating of the wire. If you have a wire that is rated at 15 amps you need a 15 amp fuse. Each circuit is rated for a certain amperage, such as 15 amps or 20 amps, and more equipment is not added to the circuit if it would cause it to draw more current than the fuse is rated for.
This can become an issue on little boats too if you have more equipment, or something like a powerful stereo system that draws a lot of amperage. Then it should have its own circuit and its own fuse for the circuit.
The question is how many fuses in the block? That depends on how much stuff you are running. I would have a fuse for the lights, one for the instrumentation, and one for any electronic devices, plus a spare. That is four. But for expansion maybe a six or 8 fuse block would be better. Again, in the future you won’t have to buy a new block. See Overcurrent Protection:
Step 12. Installing equipment .
Start with the battery, the battery switch, and the main fuse block.
Selecting a Battery: Batteries are rated by voltage and capacity. We are using a 12V battery. There are two ratings, CCA and MCA See Batteries at:
CCA Means Cold Cranking Amps. MCA means Marine Cranking Amps. These are measures of how many amps the battery can deliver for 30 seconds and maintain the voltage at 12V. Basically the higher the CCA rating the longer the battery will maintain its voltage. Batteries are also rated by amp-hours. 1 amp for 1 hour is 1 amp-hr. Generally the rating is based on how many amps the battery will discharge for 20 hours until the charge drops to 10.5 volts. The higher the amp hour rating, the longer the battery will power your equipment. Also, batteries are rated for Reserve Capacity which is how many minutes it will deliver the same voltage at 80 degrees. An average marine battery should have a Reserve Capacity of 60 to 90 minutes. Anything less is not adequate.
There are four types of batteries commonly used on boats, Wet Cell (also called lead acid, flooded, or flooded lead acid, and sometimes abbreviated FLA), AGM (Absorbed Glass Mat), Gel, and Lithium, but for now I’ll stick with the standard wet-cell battery. They are relatively inexpensive, can be purchased anywhere, and for a small boat, more than adequate. A battery with a CCA or MCA rating of 200-300 should do but we’ll determine that when we calculate the loads. See table below on how to calculate loads. Battery Capacity should be at least twice the load.
To calculate loads, list the equipment you are planning on installing. In the chart below the following items are listed. Navigation lights Bilge Pump Radio (Only when receiving) Depth Sounder engine electrical Instruments GPS Bait well pump Horn Radio TX. (VHF Marine radio. It draws more when transmitting)
Determine from the specifications for each item what the current load is in amps. Separate them into continuous loads (on all the time) and intermittent loads (only on when used). Determine how many hours they will be used. Multiply the amps times the hours to get amp hours. Add up the amp hours.
See Also Electrical Planning
| Continuous Loads | Intermittent loads | Total | ||||||
| Item | amps | hours | Amp Hours | item | amps | hours | Amp Hours | |
| Nav Lts | 1 | 8 | 8 | Horn | 1 | 0.25 | 0.25 | |
| Bilge Pump | 2 | 8 | 16 | |||||
| Radio | 1 | 8 | 8 | Radio Tx | 6 | 0.5 | 3 | |
| Depth Sndr | 0.5 | 8 | 4 | |||||
| Engine | 2 | 16 | 32 | |||||
| Instruments | 1 | 8 | 8 | |||||
| GPS | 1 | 8 | 8 | |||||
| Bait Well | 2 | 8 | 16 | |||||
| Totals | 10.5 | 100 | 7 | 3.25 | 100.3 | |||
Double the result to determine what the rating of the battery should be. For this case, 200.
Another consideration is the battery group size. Batteries come in different physical sizes. A Group 24 battery is 10 ¼ inches by 6 13/16 inches by 8 7/8 inches. A Group 27 battery is 12 1/6 inches by 6 13/16 by 8 7/8 inches. The physical size is determined mainly by how much space you have for the battery and its weight. A bigger battery weighs more. A large group size does not necessarily mean it will last longer. That is determined by the battery ratings for amp hours and reserve capacity. The most commonly used size on small boats is Group 27.
Install the battery box if you are using one, or a tray, then the battery. Now that you have installed a battery you can begin installing equipment. Install lights and electronic equipment. You want everything in place before you begin wiring. Put in switch panels and fuse blocks.
From Step 5, we need to determine the size of the main fuse at the battery. The continuous loads add up to 10.5 amps. The fuse in a DC circuit should be about 150% of the load so a 15 amp would be appropriate. (ABYC E-11.10.1.5.)
The fuses for each circuit of our example should be at least 3 amps except for the VHF radio because on transmit it draws 6 amps. So, use a 10 amp fuse for the radio circuit. Check the manufacturer's installation instructions for recommended fuse sizes for each piece of equipment. Remember, this fuse is to protect the wire to the equipment, not the equipment. Some equipment may have built in or in-line fuses for that purpose.
Step 13. Installing Wire:
Begin installing wire, starting at the battery and working outward to each fuse block and buss bar, and then on to each piece of equipment. Remember to follow the color codes and label the wires on both ends. If you decide to make any variations from your diagrams make sure you change the diagram for future reference.
Step 14. Turn on the power. Test by turning on each item, one at a time, to see if it works. Troubleshoot as you go. If there is a problem, fix it before you proceed. Once everything has been tested individually, turn on everything, one at a time, until everything is on. If a fuse blows or something doesn’t work the last item you turned on is where the problem lies. Turn everything off, fix it and then try again from the beginning.
An Excellent Article: Avoiding Boat Electrical Mistakes by Ed Sherman; Boat US Magazine https://www.boatus.com/expert-advice/expert-advice-archive/2016/august/avoiding-boat-electrical-mistakes
An excellent article by Owen Youngblood on Wiring Your Boat , from the Metal Boat Quarterly
How to Wire A Boat from New Wire Marine https://newwiremarine.com/how-to/wiring-a-boat/
The USCG Boat Builders Handbook for Electrical Systems is available on-line at https://safeafloat.com/wp-content/uploads/2021/04/I-Electrical-Systems-Final-4-14.pdf
Contact ABYC for a copy of E-11, AC and DC Electrical Systems on Boats. There is a fee. See: https://abycinc.org
Appendix A: Allowable Amperage and Voltage Drop Tables
Note: This is the table that is in the Federal Regulations. The Federal Regulation now uses the ABYC table. It is published in 33 CFR Subpart I sec 183.425. ABYC Standard E-11 has five separate tables based on how many conductors are in a wire bundle.
| Temperature Rating of Conductor Insulation | |||||||||||||
| Conductor Size English (metric) | 60 C (149 F) | 75 C (167 F) | 80 C (176 F) | 90 C (194 F) | 105 C (221 F) | 125 C (257 F) | 200 C (392 F) | ||||||
| Outside Engine space | Inside Engine Space | Outside Engine space | Inside Engine Space | Outside Engine space | Inside Engine Space | Outside Engine space | Inside Engine Space | Outside Engine space | Inside Engine Space | Outside Engine space | Inside Engine Space | Outside or Inside Engine Space | |
| 18 (0.8) | 10 | 5.8 | 10 | 7.5 | 15 | 11.7 | 20 | 16.4 | 20 | 17.0 | 25 | 22.3 | 25 |
| 16 (1) | 15 | 8.7 | 15 | 11.3 | 20 | 15.6 | 25 | 20.5 | 25 | 21.3 | 30 | 25.7 | 35 |
| 14 (2) | 20 | 11.6 | 20 | 15.0 | 25 | 19.5 | 30 | 24.6 | 35 | 29.8 | 40 | 35.6 | 45 |
| 12 (3) | 25 | 14.5 | 25 | 18.8 | 35 | 27.3 | 40 | 32.8 | 45 | 38.3 | 50 | 44.5 | 55 |
| 10 (5) | 40 | 23.2 | 40 | 30.0 | 50 | 39.0 | 55 | 45.1 | 60 | 51.0 | 70 | 62.3 | 70 |
| 8 (8) | 55 | 31.9 | 65 | 48.8 | 70 | 54.6 | 70 | 57.4 | 80 | 68.0 | 90 | 80.1 | 100 |
| 6 (13) | 80 | 46.4 | 95 | 71.3 | 100 | 78.0 | 100 | 82.0 | 120 | 102 | 125 | 111 | 135 |
| 4 (19) | 105 | 60.9 | 125 | 93.8 | 130 | 101 | 135 | 110 | 160 | 136 | 170 | 151 | 180 |
| 2 (32) | 140 | 81.2 | 170 | 127 | 175 | 138 | 180 | 147 | 210 | 178 | 225 | 200 | 240 |
| 1 (40) | 165 | 95.7 | 195 | 146 | 210 | 163 | 210 | 172 | 245 | 208 | 265 | 235 | 280 |
| 0 (50) | 195 | 113 | 230 | 172 | 245 | 191 | 245 | 200 | 285 | 242 | 305 | 271 | 325 |
| 00 (62) | 225 | 130 | 265 | 198 | 285 | 222 | 285 | 233 | 330 | 280 | 355 | 316 | 370 |
| 000 (81) | 260 | 150 | 310 | 232 | 330 | 257 | 330 | 270 | 385 | 327 | 410 | 384 | 430 |
| 0000 (103) | 300 | 174 | 380 | 270 | 385 | 300 | 385 | 315 | 445 | 378 | 475 | 422 | 510 |
Notes for the above table | |||||||
Temperature Rating of Conductor Insulation | |||||||
60oC (140oF) | 75oC (167oF) | 80oC (176oF) | 90oC (194oF) | 105oC (221oF) | 125oC (257oF) | 200oC (392oF) | |
| 1. See the following table: Temperature Rating of conductor | 0.58 | 0.75 | 0.78 | 0.82 | 0.85 | 0.89 | 1.00 |
| 2. See the following Table: Number of current carrying conductors | Correction Factor | ||||||
| 3 | 0.70 | ||||||
| 4 to 6 | 0.60 | ||||||
| 7 to 24 | 0.50 | ||||||
| 25 and above | 0.40 | ||||||
The table for voltage drop is below. This is only for 12V DC. Contact ABYC for a copy of E-11, AC and DC Electrical Systems on Boats. There is a fee. See: https://abycinc.org
This is the table to determine wire size due to voltage drop based on the length of the wire. This table is for 12 volts only. The top row is the length of the wire in feet. The first column below Total Amps, is the amount of maximum amperage. The number in the row to the right of the total Amps column, is the size of the wire for a 10% or less voltage drop. Example: 25 feet of wire (top row) at 15 amps (first column) the wire would be 14 AWG.
| |||||||||||||||||||
| Feet | 10 | 15 | 20 | 25 | 30 | 40 | 50 | 60 | 70 | 80 | 90 | 100 | 110 | 120 | 130 | 140 | 150 | 160 | 170 |
| Total Amps | 12 volt - 10% drop wire sizes gauge | ||||||||||||||||||
| 5 | 18 | 18 | 18 | 18 | 18 | 16 | 16 | 14 | 14 | 14 | 12 | 12 | 12 | 12 | 12 | 10 | 10 | 10 | 10 |
| 10 | 18 | 18 | 16 | 16 | 14 | 14 | 12 | 12 | 10 | 10 | 10 | 10 | 8 | 8 | 8 | 8 | 8 | 8 | 6 |
| 15 | 18 | 16 | 14 | 14 | 12 | 12 | 10 | 10 | 8 | 8 | 8 | 8 | 8 | 6 | 6 | 6 | 6 | 6 | 6 |
| 20 | 16 | 14 | 14 | 12 | 12 | 10 | 10 | 8 | 8 | 8 | 6 | 6 | 6 | 6 | 6 | 4 | 4 | 4 | 4 |
| 25 | 16 | 14 | 12 | 12 | 10 | 10 | 8 | 8 | 8 | 6 | 6 | 6 | 6 | 4 | 4 | 4 | 4 | 4 | 2 |
| 30 | 14 | 12 | 12 | 10 | 10 | 8 | 8 | 6 | 6 | 6 | 6 | 4 | 4 | 4 | 4 | 2 | 2 | 2 | 2 |
| 40 | 14 | 12 | 10 | 10 | 8 | 8 | 6 | 6 | 6 | 4 | 4 | 4 | 2 | 2 | 2 | 2 | 2 | 2 | 2 |
| 50 | 12 | 10 | 10 | 8 | 8 | 6 | 6 | 4 | 4 | 4 | 2 | 2 | 2 | 2 | 2 | 1 | 1 | 1 | 1 |
| 60 | 12 | 10 | 8 | 8 | 6 | 6 | 4 | 4 | 2 | 2 | 2 | 2 | 2 | 1 | 1 | 1 | 0 | 0 | 0 |
| 70 | 10 | 8 | 8 | 6 | 6 | 6 | 4 | 2 | 2 | 2 | 2 | 1 | 1 | 1 | 0 | 0 | 0 | 2/0 | 2/0 |
| 80 | 10 | 8 | 8 | 6 | 6 | 4 | 4 | 2 | 2 | 2 | 1 | 1 | 0 | 0 | 0 | 2/0 | 2/0 | 2/0 | 2/0 |
| 90 | 10 | 8 | 6 | 6 | 6 | 4 | 2 | 2 | 2 | 1 | 1 | 0 | 0 | 0 | 2/0 | 2/0 | 2/0 | 3/0 | 3/0 |
| 100 | 10 | 8 | 6 | 6 | 4 | 4 | 2 | 2 | 1 | 1 | 0 | 0 | 0 | 2/0 | 2/0 | 2/0 | 2/0 | 3/0 | 3/0 |
Navigation Lights: I added this section because many people asked for it.
Wiring Navigation Lights for boats with combination red/green bow lights and an anchor/sternlight on a pole. I have been asked many times if there is a standard wiring diagram for hooking up the lights on a small outboard or inboard boat. There are some variations on this but here is how I did it on my boat.
The below diagram is for small boats with a red/green combo light on the bow, and a single sternlight that can also be used as an anchor light. Usually these have a single switch with 3 positions; Off, 1. anchor light, 2. combo bow light, sternlight/anchor light, and instrument lights. The diagram shows a Cole-Hersee switch that is in common use, but there are other manufacturers that also make switches for this, such as BEM and Blue Seas. They all serve the same function. In this diagram the lights are wired directly to the battery. However, some people prefer to wire it through the battery switch so the battery is not discharged if the lights are accidentally left on. It is just a matter of switching the power wire from B on the lights switch, to the number one position on the battery switch.

© newboatbuilders.com 2007 All rights reserved. revised 03/17/2023
|
|
|
| This Web site may contain copyrighted material the use of which has not always been specifically authorized by the copyright owner. I am making such material available in my efforts to advance understanding of educational, economic, and scientific issues, etc. I believe this constitutes a "fair use" of any such copyrighted material as provided for in section 107 of the US Copyright Law. In accordance with Title 17 U.S.C. Section 107, the material on this Web site is distributed without profit to those who have expressed a prior interest in receiving the included information for nonprofit educational purposes. For more information see: . If you wish to use copyrighted material from this Web site for purposes of your own that go beyond "fair use", you must obtain permission from the copyright owner. |
Created with Dreamweaver 21.2 ©newboatbuilders.com 2022 All Rights Reserved
- Find A School
- Certifications
- North U Sail Trim
- Inside Sailing with Peter Isler
- Docking Made Easy
- Study Quizzes
- Bite-sized Lessons
- Fun Quizzes
- Sailing Challenge

The Anatomy of a Boat
By: Zeke Quezada, ASA Equipment , Learn To Sail , Sailboats
Do You Know the Parts of a Boat
Learning to sail is not just about feeling the wind in your sails. You also become familiar with the vessel that will be part of your new lifelong adventure. A sailboat can seem daunting with all its moving parts, but it is quite simple.
I recently learned the term Keel Hauling, and I was a bit shocked at not knowing the reference. When you sail, you take on an entirely new language of words, sayings, and jargon. A few of us sailors even embrace the same Jimmy Buffet songs as part of our perennial sailing playlist. (that is another story for a different time)
My wife, who has sailed for over 20 years, is competent under most conditions at sail and knows her way around our vessel, but I was surprised that she didn’t know some of the simple terms that we sailors use daily. There are some fundamental terms that all sailors learn as they begin their sailing career and the rest of the information follows along as you spend more time on the water.
When you embark on a sailing education in ASA 101 Basic Keelboat Sailing, you learn about the anatomy of a boat. These are part of the fundamentals of sailing. While these few terms are interchangeable among boats, they certainly are not the only terms you’ll learn, but they are the beginning of a new language when you become an ASA certified sailor.

This is a keelboat. It is different from a dinghy in that it is larger than 20 feet and has a keel. Keelboats start at around 20 feet with no upper limit in length. A 200-foot megayacht is considered a keelboat.
Sailboat Terminology

Dinghy – A small sailboat usually under 20 feet long and open for most of its length.

Keel – A fixed appendage on the bottom of the hull that provides sideways resistance needed to counter the force of the wind on the sails. The keel also carries ballast , usually iron or lead, the weight of which counteracts the force of the wind that causes a sailboat to heel , or lean over.
Hull – The watertight structural shell of a boat.
Bow – The forward part of a boat
Stern – The aft part of the boat.
Transom – The more or less flat surface that closes the hull at the stern
Rudder – The sailboat is steered by a fin-shaped appendage attached beneath the boat toward the stern which can be rotated to change the angle at which the water strikes it. Water must flow past the rudder in order fo rit to work so it will not turn the boat while at rest.
The rudder is controlled by a wheel or a tiller at the helm of the boat. The person steering the boat is the helmsman .
Cockpit – The area of the boat, usually recessed into the deck , from which the boat is steered and sailed.
Deck – The generally horizontal surface that encloses the top of the hull.
Companionway – The entrance from the cockpit or deck to the cabin.
Stanchion – A metal post that supports lifelines .
Lifeline – A wire supported on stanchions around the perimeter of the deck to prevent crew from falling overboard.
Pulpit – A guardrail at the bow or stern of a boat to which (usually) the lifelines are connected.
Learning to Sail
- ASA 101: What You’ll Learn ASA 101 is your introduction to Basic Keelboat Sailboat and is your key to a lifetime of sailing.
- How To Sail Sailing a boat is part art and part skill but few activities offer such a variety of pleasures as sailing. Something special occurs when you cast off the lines and leave your cares at the dock.
- 7 Tips For The Beginning Sailor There are the obvious things you need when you go sailing, sunscreen, a hat, a windbreaker, non-skid shoes, and wind. However, what do you really need to be ready to head out on the water?
- How To Learn To Sail You won’t have to buy a boat or learn a new language or buy a new wardrobe to get a taste for sailing. You can dictate how much you want to experience.
- Learning To Sail Is Just The Beginning Sailing means different things to different people. At ASA we understand that learning to sail is just the beginning of a relationship with a lifestyle that is infectious. Where will sailing take you? We have a few ideas but how you view sailing is the most important.
- What Is Your Role on a Boat? What type of sailor are you and what role do you take on the boat? Your ASA sailing education will prepare you to be a skipper on a sailing vessel and with that comes the responsibility of keeping your crew safe and ensuring the safety of the vessel you are sailing.
Related Posts:

- Learn To Sail
- Mobile Apps
- Online Courses
- Upcoming Courses
- Sailor Resources
- ASA Log Book
- Bite Sized Lessons
- Knots Made Easy
- Catamaran Challenge
- Sailing Vacations
- Sailing Cruises
- Charter Resources
- International Proficiency Certificate
- Find A Charter
- All Articles
- Sailing Tips
- Sailing Terms
- Destinations
- Environmental
- Initiatives
- Instructor Resources
- Become An Instructor
- Become An ASA School
- Member / Instructor Login
- Affiliate Login
10% Off Hobie Parts / 15% Off Rigging / 10-15% Off Select Kayaks - SHOP NOW
- Call Us +1-503-285-5536
- Sign in & Register
- Recently Viewed
General Parts
General Parts, Fittings, and Accessories for Small Sailboats. We offer a full range of sailboat hardware, blocks, cleats, shackles, dollies and trailers, accessories, and more. These parts are not necessarily specific to any one model of sailboat, but rather are general fittings that often work on a variety of boats for a variety of applications.

- Qty in Cart

Ronstan Horn Cleat 6-1/2 Inch

Ronstan Horn Cleat 5 Inch

Ronstan Horn Cleat 4 Inch

Fabric Guard Waterproofing Spray

Dynamic Dollies Dock Cradle

Dynamic Combo Rail System Rack Over and Spar Deck Double Tongue Dolly

Dynamic Combo Rail System Rack Over and Spar Deck Single Tongue Dolly

Dynamic Combo Rail System Rack Over Double Tongue Dolly

Dynamic Combo Rail System Rack Over Single Tongue Dolly

Dynamic Combo Rail System Double Tongue Dolly

Dynamic Combo Rail System Single Tongue Dolly

Gill Marine Tool

Gill Harness Rescue Tool

ILCA Cunningham / Outhaul Upgrade Kit Harken

ILCA Laser Vang Upgrade Harken

Rooster Carbon Laser Tiller
- Total: items /
- Add all to cart
Adding your products to cart
Subscribe to our newsletter.
Sign up for our newsletter to receive exclusive discounts, new product announcements, and upcoming sales.
Learn How to Sail a Small Sailboat – 1. The Parts of the Boat
- Snowboarding
- Scuba Diving & Snorkeling
Typical Small Sailboat
The Hunter 140 shown here is a typical centerboard sailboat used for learning how to sail and for sailing in protected waters. It can hold two adults or three children. It is easily rigged and sailed. We will use this boat throughout this Learn to Sail - Full Course.
Shown here is the boat as it is typically left on a dock or mooring, with sails and rudder removed.
If you know very little about sailing, you might want to learn some basic terms referring to the boat and sailing technique before starting this course.
The mast and boom are usually left in place on the boat. The forestay holds up the mast from the bow of the boat, and a single shroud on each side of the boat holds the mast side to side. The shrouds are mounted back of the mast, so they also keep the mast from falling forward. The stay and shrouds are made of flexible wire that can be disconnected to trailer or store the boat.
On most large sailboats, there are multiple shrouds to support the mast, along with a back stay support to the stern. Otherwise, this boat is representative of the basic standing rigging of a sloop, the most common type of modern sailboat.
The Mast Step
Here’s a close-up view of the bottom of the mast atop the boat. The stainless steel mounting piece affixed to the boat is called the mast step. In this boat model, a pin emerging from the mast on both sides simply fits into a slot in the mast step. The mast is lightweight and easily raised by hand.
Once the mast is stepped, it is held securely in place by the shrouds and forestay, as shown in the previous photo.
On most small sailboats, the rudder is mounted on the stern of the hull, as shown here. The rudder is a long, thin blade hanging vertically from a simple set of hinges (which varies somewhat among different boats). The rudder pivots on a vertical axis, swinging side to side, which turns the boat when it is moving through the water. (We’ll describe steering in Part 3 of this course.)
The rudder may be stored on the boat or removed, like the sails, after sailing. Here, the rudder is being reinstalled. On this model the rudder has a kick-up feature, which allows it to swing up if the boat strikes bottom.
The rudder is turned side to side by the tiller, the long metal arm seen here extending from the top of the rudder about 3 feet into the cockpit. On many boats the tiller is made of wood.
Note the black handle on top of the metal tiller arm. Called a tiller extension, this device mounts near the end of the tiller and can be moved far out to the side of the boat or forward. The extension is needed because when sailing close to the wind, sailors may need to move their body weight far out to the side (called “hiking out”) in order to keep the boat balanced. We’ll see this in Part 3 of this course.)
Most large sailboats use a wheel apparatus to turn the rudder, because the forces on the boat’s rudder can be so much larger that it would be difficult to steer with a tiller.
Boom Gooseneck
The boom attaches to the mast with a fitting called a gooseneck. The gooseneck allows the boom to swing far out to both sides as well as to pivot up and down.
This photo also shows the vertical slot in the mast used to hold the mainsail's front edge (the "luff") to the mast (as you’ll see in Part 2 of this course). The sail “slugs,” fittings on the sail's luff, slide up the mast in this slot.
A similar slot can be seen in the top of the boom, to hold the foot of the sail.
The L-shaped metal pin at the forward end of the boom holds the forward bottom corner of the mainsail, called the tack.
Note the two lines (never called “rope” on a boat!) running up the mast. These are the halyards, described in the next page.
The Halyards
Halyards are the lines that pull the sails up the mast. A typical small sloop like this sailboat has two sails, the mainsail and jib, and thus has two halyards – one to pull up the top corner ("head") of each sail. (We’ll see this is Part 2 of this course.)
At the end of a halyard is a fitting, called a shackle, that attaches the sail to the line. The line then runs up to a block (pulley) at the masthead, and comes back down alongside the mast as you see here. Pulling down on this end of the halyard hoists the sail up.
When the sail is up, the halyard is tied off tight to the mast cleat using a cleat hitch, as shown here.
Halyards are part of the boat’s running rigging. "Running rigging" refers to all the lines that control the sails or other rigging, which can be moved or adjusted while sailing - unlike the fixed rigging, the usually metal, fixed parts of the rig (mast, boom, stays, shrouds).
Mainsheet Block and Tackle
Another key part of a boat’s running rigging is the mainsheet. This line runs between the boom and a fixed point in the cockpit (as shown here) or cabin top. As the line is let out, the boom and mainsail can swing farther out from the boat’s centerline. As described in Part 3 of this course, moving the sails in or out, called trimming the sails, is necessary for sailing at different angles to the wind.
Even in a small sailboat the force of the wind in the mainsail can be considerable. The use of a block and tackle in the mainsheet provides a mechanical advantage so that the mainsail can be managed by one person, with one hand, while sailing.
On most larger sailboats, the mainsheet mounts from the boom to a traveler rather than to a fixed point. The traveler can move the attachment point side to side for better sail shape.
Finally, notice the cam cleat where the mainsheet exits the block and tackle. This cleat holds the mainsheet in place after being adjusted.
Jibsheet and Cleat
When the jib sail is put on the forestay (“bent on”), a sheet is run from its aft corner (the “clew”) on each side of the mast back to the cockpit. The jib sheets allow the sailor to trim the jib, as described in Part 3 of this course.
Each jib sheet is led back through a cam cleat, as shown here, which holds the line in place. The jaws of the cam cleat allow the line to be pulled back but not slip forward. To release the jib sheet, the sailor jerks the line up and out of the jaws (into the open space below the top red piece shown).
The Centerboard
The final part we’ll look at in this boat introduction is the centerboard. You can’t actually see most of the centerboard, however, because it is in the water below the boat. This photo shows only its top edge protruding from the centerboard trunk down the middle of the cockpit.
The centerboard is a long, thin blade mounted at one end on a pivot point. When its control line is let out, the centerboard swings down into the water – usually about 3 feet down on a boat of this size. The thin board slices cleanly through the water as the boat moves forward, but its large flat side provides resistance to prevent the wind from blowing the boat sideways. In Part 3 of this course we’ll discuss how the centerboard is used while sailing.
Note the centerboard control line running back on the right side of the centerboard trunk. The cleat that holds the line and keeps it from moving forward is called a clam cleat because of its shape. With no moving parts, this cleat holds a line squeezed into it. It is not as secure as the cam cleat for the mainsheet and jibsheets, but the force on the centerboard line is much less.
This completes our introduction of the basic parts of a small sailboat.
- The Sunfish: A Perfect Lake or Urban Sailboat
- How to Gybe a Sailboat
- How to Raise the Mainsail
- Best Sailing and Boating Apps
- Choosing an Inboard or Outboard Engine
- Choosing a Centerboard or Fixed Keel Sailboat
- When to Adjust Sailboat Sails for Stronger Winds
- How to Tack a Sailboat
- Using AIS on Your Sailboat
- How to Use a Sailboat's Outhaul
- How to Boat
- How to Rig a Preventer Line
- How to Heave To a Sailboat
- How to Tow a Dinghy Behind a Sailboat
- Buying a Used Boat Online
- How to Anchor a Sailboat
Small Sailboat Sizes: A Complete Guide

Last Updated by
Daniel Wade
October 30, 2022
Key Takeaways
- Small sailboats are easy to sail, rig, and are affordable
- They are usually under 20 feet to be considered small
- Might not fit a particular sailing goal
There are plenty of small sailboat sizes to accommodate any sailing experience. But what kinds of small sailboats are there?
Small sailboats are generally under 20 feet in length, come in a variety of designs, and have different hulls. These include monohulls, catamarans, and trimarans. As long as they have a mast, rudder, sail, and are under 20 feet, it is considered a small sailboat.
According to experienced sailors that use a smaller boat, it is best to have one that is easy to handle and accommodates their sailing goals. When searching for the best small sailboat, it will likely differ from one person to the next.
Table of contents
23 Small Sailboats to Compare
When looking at different types of small sailboats, it is important to see how they are designed. Depending on the sailing goals a person has will ultimately affect how they intend to sail.
If I have a Hobie catamaran, I am likely going to use it for recreational purposes like coastal cruising instead of racing. For shallow drafts, I would need something that can handle entering that territory and not risk damaging a keel on some monohulls.
Marblehead Daysailer
The Marblehead 22 daysailer is a traditional looking monohull perfect for everything related to small sailboats. Even though it is compact, there is enough room for guests on board.
It has almost a 12 foot cockpit to seat several people, along with a stowaway cuddy in the front to put some gear into. With its bulb keel, however, I would not take it into shallow waters.
A Laser is a great small sailboat that is commonly raced. In fact, they have been used in the Olympics every year since 1996.
Laser’s have a tendency to capsize if mishandled by inexperienced sailors in rough conditions, but are good to learn how to sail. I would recommend taking them out on lighter days and calmer conditions.
Catalina Sport
The Catalina 22 Sport has earned the reputation for the best small sailboat for years. It has simple amenities for different sailing goals, but also has a retractable keel to allow for shoal draft exploration.
For a boat this size, it can sleep four people and has a swim ladder in the back. Sailors that are used to simple designs will be happy that it has a roller furling jib, a fractional rig, and a mainsail. For a boat that is under 25 feet, it is arguably the epitome of small sailboats.
Cape Cod Daysailer
The Daysailer by Cape Cod was a first of its kind back in the 1950’s. It could travel however a sailor saw fit, with capabilities of racing, cruising, or simple pleasure.
Roughly a thousand were built by various shipyards, but Cape Cod still continues to produce them. For a 16 foot sailboat, it packs a punch with an affordable price and enough room for a few people.
The BayRaider from Swallow Yachts is another great example of a small sailboat that is easy to navigate and to put on a trailer for transport. What I love about it is that just about all of the 20 feet of the boat is an open cockpit.
If I were consistently using it in rougher waters, I would recommend adding a spray hood to help keep sections of the boat dry. In addition, I would look for the option to add stability with 300 pounds of water ballast.
For those that enjoy a solo ride, the Beetle Cat is one to consider. This boat has a draft of two feet and is roughly 12 feet long, which makes it perfect for coastal cruising or much tighter spaces.
With its single gaff-rigged sail, it offers tons of power even with lighter air. It is also nice to use when the conditions become rough and it is easy to reef down.
West Wight Potter
The West Wight Potter has a particular model, the P19, that is on many sailors’ lists of great small sailboats. A lot of sailors prefer this boat due to a variety of features for its size.
At just under 20 feet, it has four berths, galley, sink, stove, and even a cooler. This boat also has closed-cell foam on the fore and aft, making it virtually unsinkable.
The Norseboat 17.5 is the perfect sailboat in mind when it comes to rowing and sailing. Whether it has one or two people, there is plenty of room to sail comfortably.
While it is not the best boat to probably have in rough conditions, I would likely use this to find coastal areas with good camping spots. With its excellent load capacity, there are plenty of opportunities to bring all kinds of gear without fear of weighing the boat down.
Even though the Montgomery 17 is advertised as a trailerable pocket cruiser, it packs a punch for a smaller sloop rig. It even comes with a centerboard keel that can be retracted to make the boat draft just two feet. This is great for those that want to cruise along the coast or beach it and go exploring.
The cuddy cabin has plenty of headroom and two bunks for guests. There are other models that Montgomery offers such as the 15 and 23, but the 17 is arguably the most attractive for tighter spaces navigating and the best bang for buck scenario.
The CW Hood 32 is somewhat misleading for a small sailboat since it is roughly 32 feet in length. However, sailors will only use about half of the boat in the cockpit with seating and navigating.
This boat is specifically designed for day sailing in mind, with nothing on board to distract anyone from sailing. It is a perfect sailboat for a family without being too large to handle.
The 17 foot and half Sun Cat from Com-Pac Yachts is a great looking small sailboat. With its gaff-rigged mainsail, it powers easily with light conditions.
It can be for solo sailing or a small group that wants to share twin six foot berths. It has a handful of amenities to make this a great boat to have on the weekend or small trips.
There was a time that the Sunfish was the most popular small sailboat in existence. But price and competition flooded the market and other top names are pushing them away from the top.
However, this might be a good opportunity to find one at a discount. The Sunfish is excellent for those wanting to day sail or learn how to sail, meaning anyone can enjoy time on the water with this simple 14 foot setup.
The Catalina 16.5 is considered the middle child between its models of 12.5 and the 22. It can come in two different models, one with a centerboard or another with a shoal draft fixed keel.
At slightly over 17 feet, the centerboard model can draft as low as five inches on the water or a little over four feet with the board down. It also features plenty of room in the cockpit and a waterproof hatch for storage.
For those that want a taste of stability from a catamaran and a small sailboat that is easy to trailer, a Hobie 16 is the right boat. Since 1969, there have been plenty of models from that brand but over 100,000 have been made with the 16 alone.
All catamarans can be beached, but some might need some attention beforehand to ensure so. For example, this one will need rudders kicked up before beaching.
The Hunter 15 is the pinnacle of simplicity and functionality. This boat, whether an experienced sailor or newbie is navigating, is one of the best boats without having to think too much about while underway.
With its kick up rudder, any sailor can relax as they enter shoal drafts. This 15 footer is great for day sailing since there are not any special features on board.
Super Snark
The Super Snark has been around since 1970 and has proven to be successful at just 11 feet in length. It is easy to transport, either on a trailer or on top of a vehicle.
The boat weighs just 50 pounds and has a payload capacity of about 310 pounds. For those that want a small unsinkable boat built for two people, it is hard to pass up a Super Snark.
Flying Scot
The Flying Scot is another great small sailboat that is just under 20 feet in length. Not much has changed since it was produced in 1957 with its sloop rig and spinnaker.
Even though it is a good racer for just one or two people, it can comfortably be used as a family boat for up to eight people. It also has a centerboard keel that can be retracted to make it have an eight inch draft.
RS Sailing typically builds racing dinghies, but the Venture model is a 16 footer that is great for those newer to sailing. This boat is commonly used in training classes across the U.S.
The cockpit can comfortably hold a handful of people or a group of smaller kids. It also features an outboard motor mount and a swim ladder in case anyone wants to take a swim.
The RS Sailing brand needs one more mention due to the amount of small sailboats they put out. The RS Aero, for example, is an award winning racing dinghy just shy of 14 feet that has been used in competitions all over the world.
It is not a boat that can be easily learned for a newbie to reach top speeds, but experienced racers love the performance it offers. It only seats one, but it is perfect for those that have sailing experience, whether they are young or old.
Topaz makes a variety of smaller sailboats, but the one that is most popular is the Taz. At just under 10 feet in length, it is one of the smaller sailboats out there that can accommodate an adult and maybe a small child.
This could also be used for larger boats that need a dinghy to make it to shore. For the price point, it will be difficult to ignore for a compelling dinghy.
The WRTango by WindRider is a perfect trimaran at 10 feet that is easy to sail and to transport. It is the smallest edition of trimarans offered by this brand, just behind the WR 16 and 17.
Since it has forward facing seating, steering with a foot pedal, and a lower center of gravity, sailors will feel like they are sitting in a kayak. It has a six inch draft, a single sail, and heavy duty outriggers that are designed to take a beating.
Minicat has a special line of inflatable catamarans available in various sizes. These come equipped with a multi-piece mast and even a trampoline, along with the inflatable hulls of course.
It is arguably the easiest small sailboat to travel with, as it can be put away in one or two bags for transport. As for sailing, it rivals the speeds and handle of other popular small catamarans.
Vancouver 28
The Vancouver 28 is outside the range of what would be considered a dinghy, but it still offers a lot of value for being a smaller bluewater sailboat. At 28 feet, there is a little something for everyone.
This boat is considered a pocket cruiser that can essentially go anywhere. For those that are trying to downsize from other larger sailboats, they should strongly consider a change with the Vancouver 28.
Pros and Cons to Small Sailboats
Small sailboats have become more popular over the last few decades. Smaller bluewater sailboats have a lot to like, but also present some disadvantages that might not fit into a sailor’s category to sail.
It is important to figure out what sailing goals a sailor wants to take part in. Whether it is cruising, weekend sailing, or day sailing, small sailboats are potentially a good fit.
There are a handful of pros to look at for small sailboats. The key is to find one that fits specific to a sailing goal, such as racing or cruising.
It is easy to see why small sailboats are common, especially since they cost much less than larger ones. They are even less expensive models if a sailor can find a used one.
Depending on how long a boat is will determine how much it costs to build. It is easier and costs less to make repairs on smaller boats since the damaged areas are smaller as well. So finding a small, yet functional sailboat will be the most cost effective.
Simpler Systems
Small sailboats are easier to maintain and have a lot less issues than larger boats. This is simply because they have a lot less to offer, such as a watermaker or an electric anchor windlass.
Some are just bare bones when it comes to sailing, while others have galleys or berths. Depending on the model and brand will determine how easy it is to maintain.
Easy to Sail
Inexperienced sailors often gravitate to smaller sailors simply because they are easier to sail. Imagine the difference between raising a sail between an 18 footer and a 48 footer, or even the difference between one or a few sails.
These boats are also meant for solo sailing or for smaller groups, making it easier to handle functions on board. These are also used in training schools that teach how to sail. There is also less stress on the boat in general, making it easier to maintain.
Easy to Rig
Whether a sailor wants to put a small sailboat on a trailer or the top of their car, no one can deny how convenient it is to move around. No special tricks are needed for these types of boats, as they are simple to put up once they are done being used.
When looking at the inflatable catamaran for example, it is one of the easiest to set up and put away. Larger boats require to be parked at a dock or will be more difficult to pull out of the water.
Easy to Find Parts
Every sailboat will need something replaced or fixed at some point. For small sailboats, it will be easier to find parts or replacement items because these boats are often made in bulk.
Smaller boats can be found everywhere and a lot were made back in the early 1950’s and 60’s. Some will have compatible parts to newer ones and the other way around.
As good as small sailboats might be to some, sailors might choose to look elsewhere if their sailing goals do not fit what a small sailboat offers. If sailors are simply wanting to get out on the water and not have a lot of amenities, this could work for them. So depending on what a sailor is expecting to get out of a boat makes the biggest difference.
Much Slower
If sailors were to travel the same distance at the same time in different sized boats, more often than not the large boat will win. While some small sailboats are only meant for racing, a lot of them are not meant to travel very fast.
The hull speed is in conjunction with the square root of the length of the water, meaning you need more hull to go faster. This could become an issue when trying to evade a storm and get to safety quickly.
Larger boats tend to average between seven to 10 knots while small sailboats average less. Depending on how much the difference is in length and sail area will determine the speed.
Not as Much Space
Small sailboats under 20 feet are difficult to live aboard or travel long distances with a lack of gear or food. There are some that can cater to one or two people for full time sailing, but these have limited space as well.
Unless sailors are able to effectively downsize from larger boats to smaller boats, there will likely be some issues with the amount of gear or other items they are taking on board. In addition, it makes it difficult to travel with a crew or even a pet.
Not as Comfortable
There will be some debate between how comfortable small sailboats are, but the argument can be made that they are not as comfortable as larger sailboats. Generally, anything over 20 feet is recommended to live aboard or engage in bluewater sailing long term.
For those that want to be as comfortable as possible while sailing, smaller sailboats might lack in that regard. Since there is not as much seating and a lack of a galley or berth, sailors might pass on small sailboats for comfort.
Why A Small Sailboat Could Be Beneficial
A variety of factors will contribute to a sailor wanting to select a specific boat to sail in. These include budget, sailing goals, and availability nearby. Small sailboats have proven to be effective for a variety of purposes.
For newer sailors, small sailboats are definitely the way to go to learn how to sail without blowing tons of money on a larger setup. After sailors have developed a comfortable amount of experience with their small sailboat or if their sailing goals have changed, then it would be ideal to move onto a larger boat to fit their needs.
Small sailboats definitely have their place in today’s market. From racers to cruisers, or daysailers to weekenders, small sailboats can fit any category that a sailor could possibly want to experience.
It is ultimately up to the individual on how they want to approach a small sailboat and its capabilities. In the best scenario, one should find a boat that is in good condition, is affordable for their budget, and is easy to handle based on their sailing goals.
Related Articles
I've personally had thousands of questions about sailing and sailboats over the years. As I learn and experience sailing, and the community, I share the answers that work and make sense to me, here on Life of Sailing.
by this author
Learn About Sailboats
Most Recent

What Does "Sailing By The Lee" Mean?
October 3, 2023

The Best Sailing Schools And Programs: Reviews & Ratings
September 26, 2023
Important Legal Info
Lifeofsailing.com is a participant in the Amazon Services LLC Associates Program, an affiliate advertising program designed to provide a means for sites to earn advertising fees by advertising and linking to Amazon. This site also participates in other affiliate programs and is compensated for referring traffic and business to these companies.
Similar Posts

Affordable Sailboats You Can Build at Home
September 13, 2023

Best Small Sailboat Ornaments
September 12, 2023

Discover the Magic of Hydrofoil Sailboats
December 11, 2023
Popular Posts

Best Liveaboard Catamaran Sailboats
December 28, 2023

Can a Novice Sail Around the World?
Elizabeth O'Malley
June 15, 2022

4 Best Electric Outboard Motors

How Long Did It Take The Vikings To Sail To England?

10 Best Sailboat Brands (And Why)
December 20, 2023

7 Best Places To Liveaboard A Sailboat
Get the best sailing content.
Top Rated Posts
Lifeofsailing.com is a participant in the Amazon Services LLC Associates Program, an affiliate advertising program designed to provide a means for sites to earn advertising fees by advertising and linking to Amazon. This site also participates in other affiliate programs and is compensated for referring traffic and business to these companies. (866) 342-SAIL
© 2024 Life of Sailing Email: [email protected] Address: 11816 Inwood Rd #3024 Dallas, TX 75244 Disclaimer Privacy Policy
The Illustrated Guide To Boat Hull Types (11 Examples)
I didn't understand anything about boat hull types. So I've researched what hulls I need for different conditions. Here's a complete list of the most common hulls.
What are the different boat hull types? There are three boat hull categories: displacement hulls, which displace water when moving; planing hulls, which create lift at high speeds; and semi-displacement hulls, which displace water and generate lift at low speeds. The most common hull types are round-bottomed, flat-bottomed, multi, V-shaped, and pontoon hulls.
But that's all pretty abstract if you ask me, so below I'll give a simple overview of what it all means. After that, I'll give a list with pictures of all the different designs.
A Simple Overview of Boat Hull Types
Your boat hull will be the biggest factor in how your boat handles or sails, how wet it is, how bumpy - absolutely everything is determined by the hull shape. So it's important to understand what different hulls will do for you, and what each hull is best for. First, let's slice it up into rough categories.
Roughly, you can divide boat hulls into three categories:
- Displacement hulls - Lie inside the water and push it away when they move
- Planing hulls - Lie on top of the water and don't push it away
- Semi-displacement hulls - Lie inside the water and push it away, but can generate lift
Everything I'll be mentioning below is one of those three, or something in between.
There are five common boat hull types:
- Round-bottomed hulls - handle well in rough water: sailboats
- Flat-bottomed hulls - very stable for calm inland waters: fishing boats
- Multihulls - very stable and buoyant: catamarans
- V-Shaped Hulls - fast and comfortable in chop: powerboats
- Pontoon hulls - fast and stable: pontoon boats
And then there's everything in-between.
Here's a quick and handy overview of the different hull types
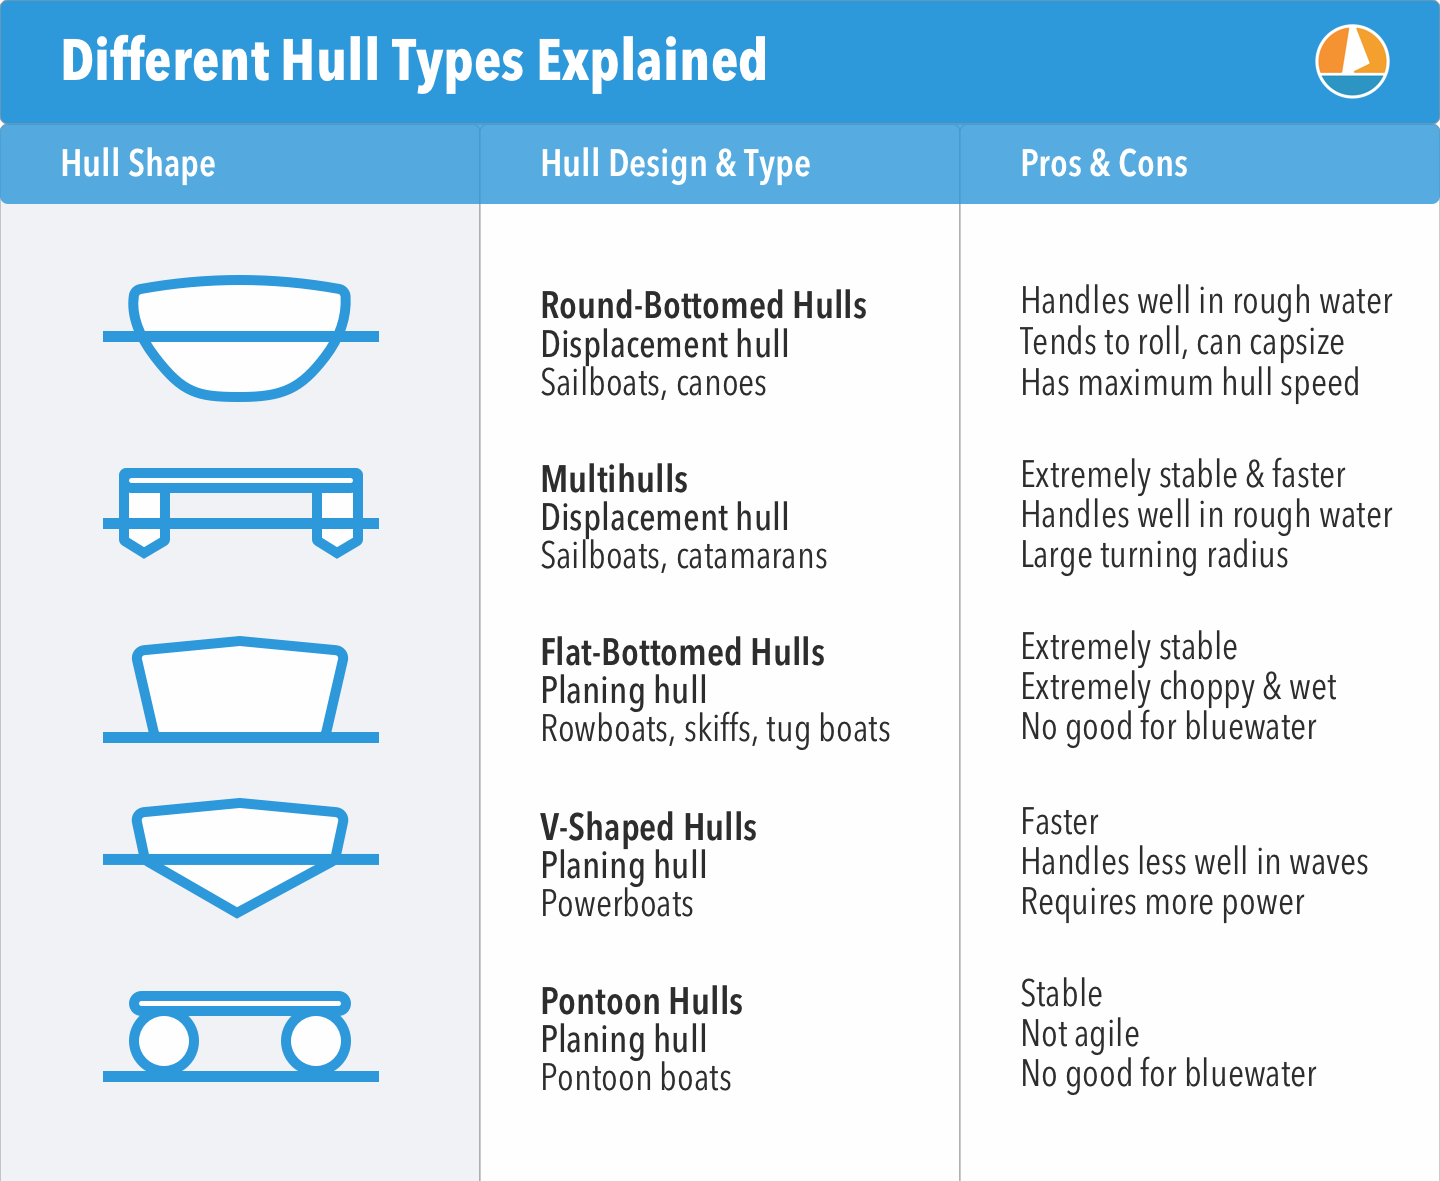
In each category, we find different designs and styles that have different characteristics. There isn't a real clear distinction between categories and styles: there are semi-displacement hulls and so on. So I thought the best way to learn you the different hull types is by simply creating a list with lots of pictures, instead of getting all theoretical about it.
So below I've listed all the different hull styles I could possibly think of, mention what category and type it is, the pros and cons of each one, and give you examples and illustrations for each one.

On this page:
Displacement hulls, round-bottom hull, catamaran hull, trimaran hull, planing hulls, flat-bottom hull, deep v-hull, modified-v hull, stepped hull, pontoon hull, semi-displacement hulls.
Examples: Sailboats, trawlers, fishing boats

Displacement hulls displace water when moving. These hulls lie in the water, instead of on top of it. The amount of water they displace is equal to the boat's weight. Displacement hulls handle way better in rough waters than flat-bottom hulls. That's why most cruisers have some sort of displacement hulls. There are actually all kinds, shapes, and forms of the displacement hull design, which we'll go over later.
The most important thing to understand about the displacement hull, is that it operates on buoyancy. This means that most of the boat's weight is supported by its capacity to float . Planing hulls, on the other hand, operate on lift instead, but we'll dive into that later.
Sailboats typically have displacement hulls, but also fishing boats, trawlers and crabbers. All in all, it's used for each boat that needs to handle well in rough conditions.
Learn everything there is to know about displacement hulls in this article . It lists all the pros and cons and really goes into detail on the nitty-gritty about how displacement hulls actually work .
But they are also slower than flat and planing hulls because the boat creates more resistance when moving. It has to push the water aside. In fact, this type of hull has a built-in upper-speed limit.
This upper-speed limit is called maximum hull speed . It means that the length of a displacement hull directly determines the maximum speed. It can't go faster, because the water-resistance increases with the boat's speed. To learn everything about calculating maximum hull speed , please check out my previous article here.
A round-bottomed hull is a type of displacement hull - it lies in the water and has to power through it. But since it's rounded, it creates little resistance and is effortless to move through the water. It's a very smooth ride and typical for any sailboat that sort of glides through the waves. In contrast, powerboats really have to eat their way through the water.
Examples: Canoes, sailboats
They are also one of the least stable. Since the bottom is rounded, your boat or canoe will rock plenty when boarding or moving around. They are also easy to capsize. That's why pro canoers learn to do a 360 in their canoes. I've never did a roll myself but came close enough a couple of times.
Almost all sailboats use a round bilge as well. This provides it its buoyancy and makes sure it handles well in waves. But since a rounded bilge is easy to capsize, a lot of sailboats have some sort of keel, which stabilizes the roll.
Nearly all ocean-going vessels use some sort of displacement hull, and the round bottom is the most common one. But our next guest is very popular as well.
The catamaran is similar to the pontoon hull (read on to learn more on that one), but it is a displacement multihull instead of a planing one. So it has two hulls, that lie inside the water and displace it. Like the pontoon, you will have to try really hard to capsize this design (and it won't work).
Examples: well, catamaran sailboats. But also this cool catamaran trawler:
Catamarans are extremely popular ocean cruisers. Their biggest pro is their extreme stability and buoyancy. And they have a very shallow draft for a displacement hull, making them very popular for sailing reefs and shallow waters, like the Caribbean.
Some cons for the catamaran are less agile than monohulls. They have a large turning radius, making them less maneuverable. Also, expect to pay high marina fees with this one.
Speaking of marina fees, our next one can go either way.
I think trimarans are incredibly cool, and especially the second type.
There are two types of trimarans:
- a catamaran with three hulls instead of two,
- or a displacement monohull with two floaters.
The first has the same characteristics as the catamaran: it's a displacement multihull, but now with three hulls:
The second can be a regular displacement monohull, with two pontoon-type floaters that provide extra buoyancy, making the total thing a hybrid between pontoon and displacement:

This last one has all the pros of a catamaran in terms of stability, but: you can simply wheel in those floaters whenever you head for port. That saves you a lot of money. And you can trailer her! Imagine that, a towing a trimaran home.
So those were the most common displacement hulls, aka what lives in the water. Let's move on to the planing hulls, aka what lives on the water.
Planing hulls are a hybrid between the flat-bottom and displacement hulls. Planing hulls displace water at low speeds , but create lift at higher speeds . The shape of their hull + speed lifts them out of the water, making them glide on top of the water. Most powerboats look like flat-bottom boats but use a shallow V-shape that helps the boat to handle better at higher speeds.
Examples: Water sports boat, powerboats
The most important thing to understand about planing hulls is that they operate mainly on lift instead of buoyancy. This means the weight of the boat is mainly supported by dynamic forces 1 . With the right amount of power, this design generates lift, which results in less resistance. This is why they are a lot faster than boats with displacement hulls, but also a lot rougher, even with mild chop.
A lot of powerboats use some sort of planing hull. Again, there are many designs and variations on the planing hull, and I'll try to mention as many as I can below.
Because the wedge of the hull runs into the water, it is much easier to handle at high speeds. At lower speeds, it is able to keep its course, even with a bit of wind. However, whenever the boat starts planing, it is prone to wind gusts, since the wedge shape no longer stabilizes the boat.
The flatter the hull, the faster it will go, but also the more poorly it will handle. Other powerboats use deep V-hulls, which I'll discuss below. But first, let's take a look at the flattest hulls you'll ever see.
A flat-bottom hull lies on top of the water and doesn't displace water (okay, very little) as it moves. Since there is no displacement, there is also little to no friction when moving. This makes it potentially fast, but it handles pretty poorly. It is one of the most stable hull design.
Examples: rowboats, (old) high-performance powerboats, small skiffs, small fishing boats, tug boats
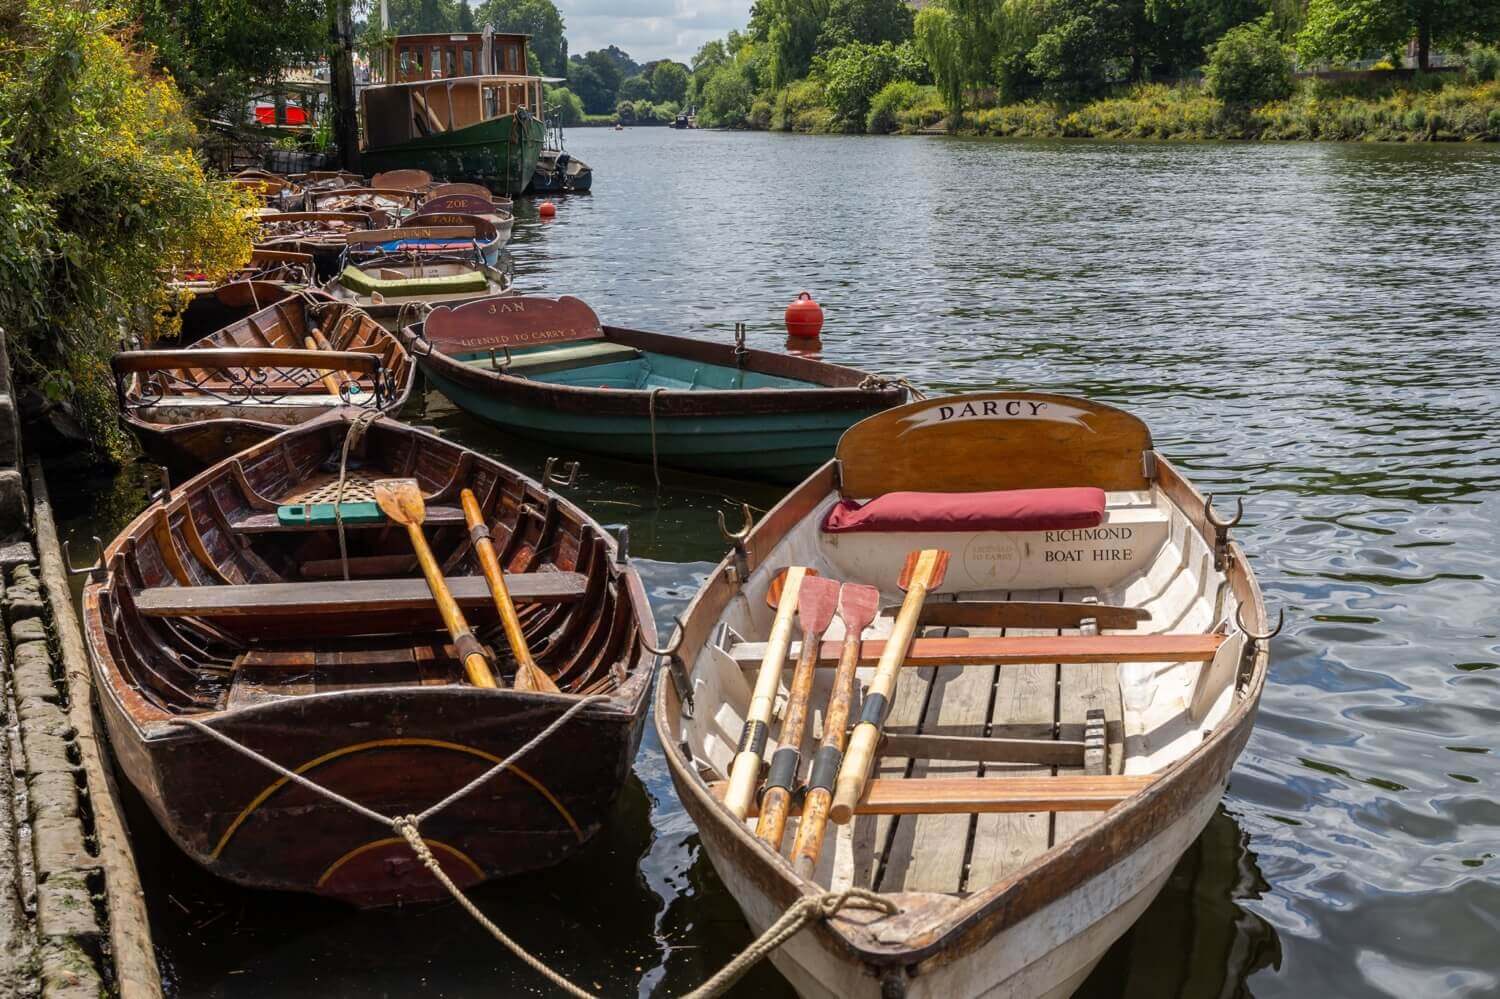
They aren't just incredibly stable, they're also very practical. Because the bottom is practically flat, they maximize boat surface. But they are also extremely choppy in rough weather and waves. They will handle very poorly with stiff winds, as the wind can simply catch them and blow them across the water surface. That's why this design is almost exclusively used for calm, small, inland waters.
This type of hull operates mainly on buoyancy , like the displacement hull, but it doesn't require the same amount of power to propel, which is why it's faster.
Because of the uncomfortable ride, not a lot of boats use a perfectly flat bottom. Most boats nowadays use some sort of v-hull or hybrid design, like a semi-displacement hull; especially larger boats. So not a lot of boats have a real flat bottom. However, we do call a lot of boats flat-bottomed. How come?
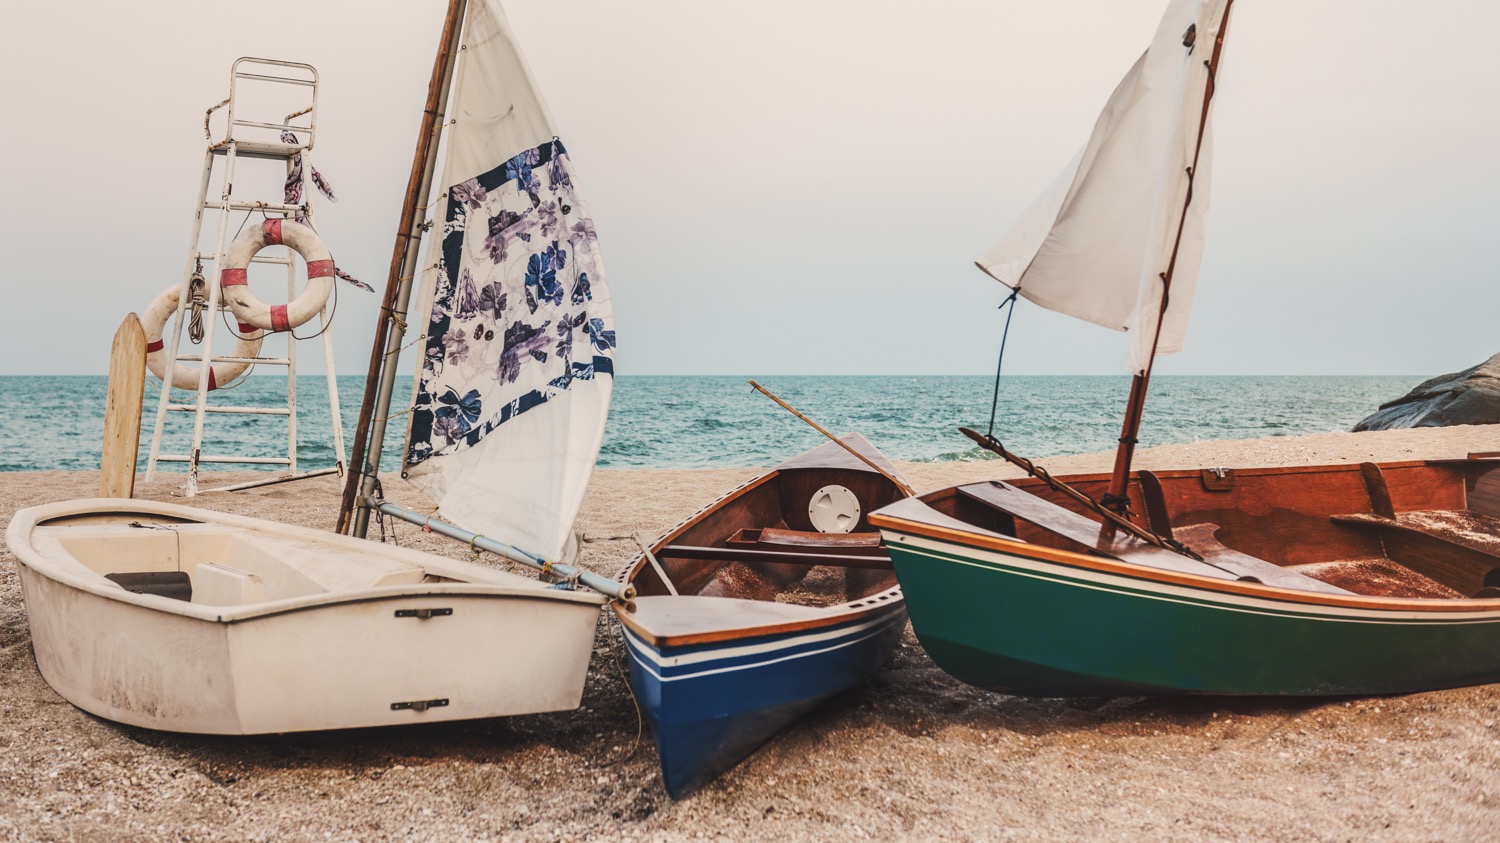
There are two types of hulls we call flat-bottoms:
- Of course boats with an actual flat bottom
- Boats with almost no deadrise
What is the hull's deadrise? The deadrise is the angle of the front of the hull to the horizontal waterline.
As you can see, the green sailing dinghy in the picture above has a deadrise that's barely noticeable.
Let's move on to other variations of the planing hull. One of the most popular hull design for modern-day powerboats is the Deep Vee hull. And that's as cool as it sounds.
This is a type of planing hull that combines the best of both worlds.
These types of hulls are very popular on modern-day powerboats, and no wonder. With a V-shape that runs from bow to stern, deep into the water, you can handle this boat even in offshore conditions. It handles a lot better than flat-bottomed hulls, while it's at the same time extremely fast.
Examples: Most modern powerboats.
The Deep V-shape acts as a tiny keel of sorts, stabilizing the boat and making it more reliable and maneuverable. The rest of the hull acts as a planing hull, giving the boat its fast edge. Even at high speeds, the Deep V will cut into the water, making it more handleable.
The deep-V design is just one of many variants on the V-hull. Below we'll talk over another, the modified V hull.
The modified V hull is the ultimate crossover of all planing hull types. It's a mix of the flat-bottom and Deep V hull. It is one of the most popular hull designs for small motorboats. It's flat in the back and then runs into a narrow V-shape to the front. The flat back makes it more stable, and adds a little speed, while the V-shape front ensures good handling.
It is, in short, kind of the compromise-family-sedan of boat hulls. It's the fastest design that's also stable, that's also safe, and that also handles well. But it's not the best in any of those things.
Most powerboats you've seen will have some sort of Vee or Modified-V hull.
Stepped hulls are used on high-performance powerboats. It's a type of planing hull that reduces the hull surface by adding steps, or indents in the hull below the waterline. It looks something like this:
It is said to work extremely well at high speed (60 knots and up) and adds up to 10 knots to your top speed.
On to our next design. There are also planing multihulls, and they might even look like catamarans to you. Meet the pontoon hull.
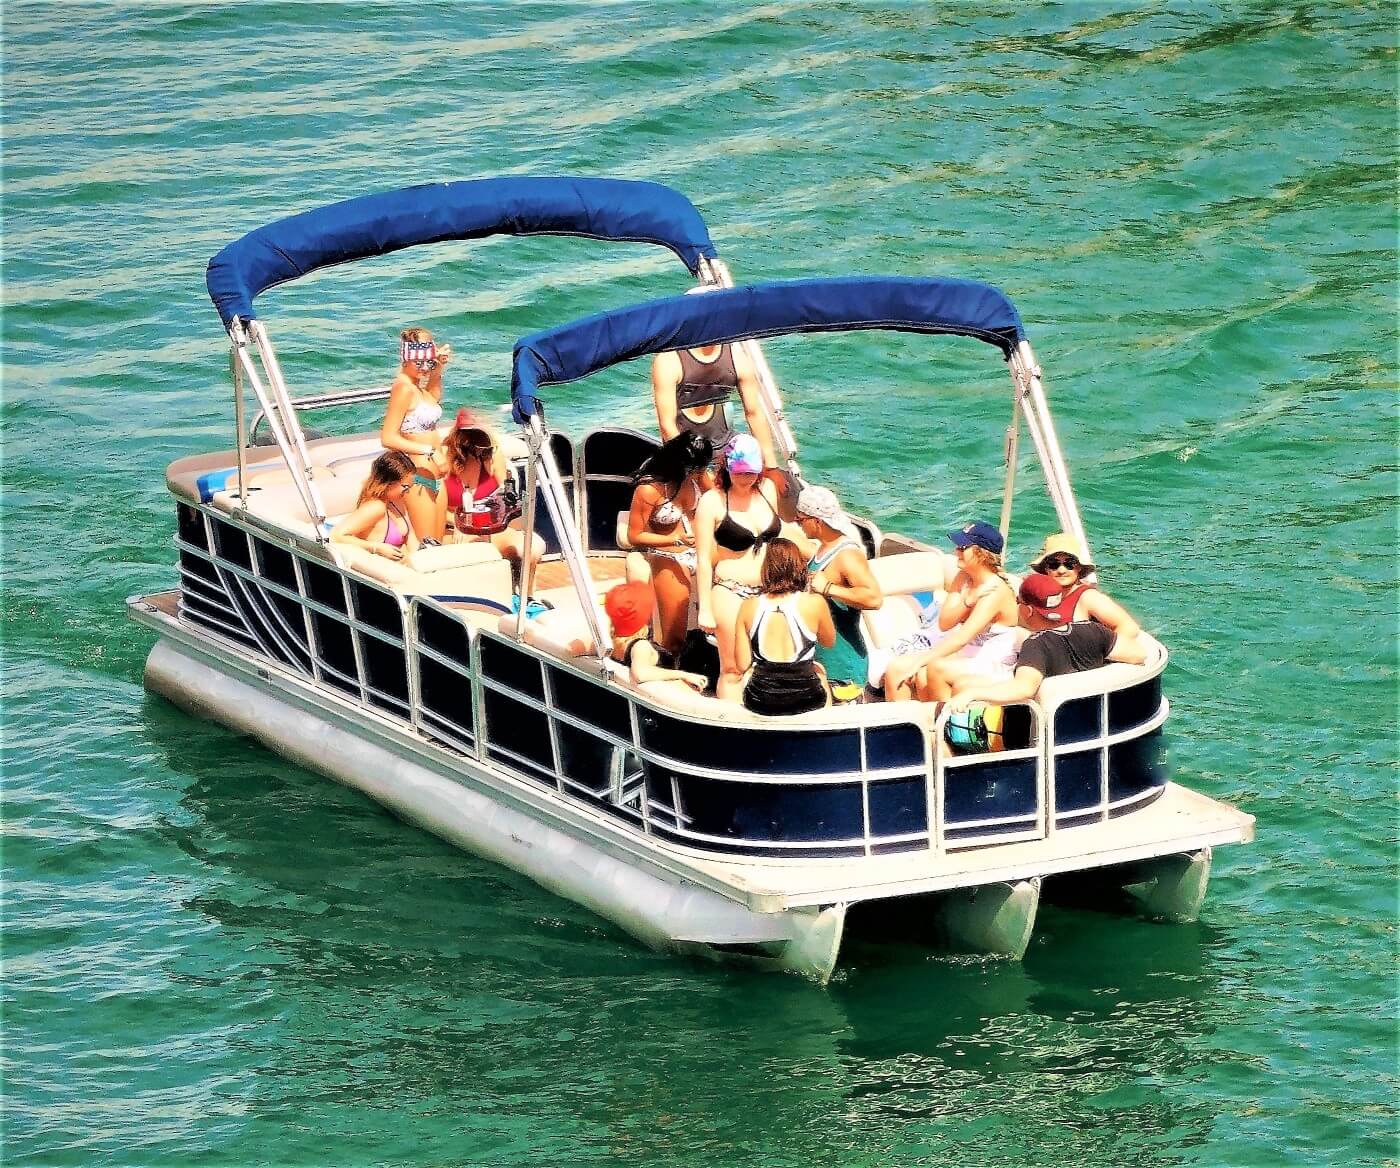
Pontoon hulls float on top of the water using pontoons or floaters that create lift. It's a type of planing multihull that doesn't lie in the water, so it doesn't displace a lot of water. They don't really handle well. As with any multihull, they aren't agile - they're not great at maneuvering. They also have a very large turning radius. But they are extremely stable: there's no chance you'll capsize this.
Examples: Cruisers, modern trawlers, motor yachts, Maine lobster boats
Semi-displacement hulls are smack bang in the center of planning and displacement hulls. They are a bit better for speed than displacement hulls are. They are a bit better for handling rough waters than planing hulls are. This makes them very versatile.
You can see these a bit like being 'half-planing' hulls. These hulls are designed to plane at lower speeds than normal planing hulls - somewhere in the range of 15 - 20 knots, depending on the length of the boat. It also requires less power. When the hull lifts, it reduces drag (water resistance), making it faster and more efficient.
Semi-displacement hulls are perfect for boats that need to be steady and seaworthy but fast at the same time.
For more information about semi-displacement hulls, please check out my in-depth guide to semi-displacement hulls here . It has a diagram and lists all the pros and cons.
So those were my 11 examples, and my step by step explanation of the different types of boat hulls and functions. You now have a solid basic understanding of boat hulls, and can recognize the most common ones. I hope it was helpful, and if you want more good sailing information, be sure to check out my other articles below.
https://www.soundingsonline.com/boats/how-different-hull-types-react-in-rough-water . ↩
I was wondering what your opinion would be on the ship uss Texas as far as hull type and bow type. I think it has a plumb bow and it looks to have a displacement or flat bottom hull. Im doing some research and a better trained eye would be of great help. I used images “bb-35 dry dock” to help see the hull shape. Thank you
Shawn Buckles
Hi Kirk, I don’t know about trained but here we go. I’ve checked the picture, it’s definitely a displacement hull I’d also say it’s a plumb bow.
Hahahahaa imagine liking boats hehehehehe Extremely stable & faster Handles well in rough water Extremely stable & faster Handles well in rough water Extremely stable & faster Handles well in rough water Extremely stable & faster Handles well in rough water Extremely stable & faster Handles well in rough water Extremely stable & faster Handles well in rough water Extremely stable & faster Handles well in rough water Extremely stable & faster Handles well in rough water Extremely stable & faster Handles well in rough water
Leave a comment
You may also like, a complete guide to displacement hulls (illustrated).
The displacement hull is the classic go-to hull design for sailboats and one of the most recognizable ones out there. In this guide, I explain all there is to know …

Semi-Displacement Hulls Explained (Illustrated Guide)

The Ultimate Guide to Sail Types and Rigs (with Pictures)

How Much Does it Cost to Dock a Boat for a Year?
IMAGES
COMMENTS
The hull is what most people would consider 'the boat'. It's the part that provides buoyancy and carries everything else: sails, masts, rigging, and so on. Without the hull, there would be no boat. The hull can be divided into different parts: deck, keel, cabin, waterline, bilge, bow, stern, rudder, and many more.
Beginners guide: The basics of boat wiring. Wiring schematics, pictures, best practices and tips to get your boat's electrical systems in shape.
Basic parts of a sailboat Diagram explaining the basic parts of a sailboat. Bow. The boat's bow is the front part, typically shaped like a "V" to cut through the waves. Larger vessels often have a locker for their anchor chain in this section, holding the anchor at the front. Midship. The midship section is the center of the boat.
A nother common rig used in small sailboats is the LATEEN RIG illustrated in Fig. 2-5. This rig uses a single mast, somewhat short, and usually unsupported with wires, onto which is attached two poles. A triangular shaped sail is then attached to these two poles, but not to the mast.
The ABYC allows a maximum of 10 feet between the deck inlet and the main circuit breaker. Since this design is for a small boat we will just assume that it is 10 feet or less to the main panel. For 30 Amp service the wire before the main breaker needs to be Triplex 10/3 awg. Before going to the main breaker panel you should seriously consider a ...
When you are learning to sail, understanding the parts of a sailboat can be confusing. We have listed the major parts of a sailboat in the diagram below to help get you started. The common sailboat comprises eight essential parts: hull, tiller, rudder, mainsail, mast, boom, jib and keel. The hull is the shell of the boat, which contains all the internal components. Its symmetrical shape ...
Fit the bailer cap into the hole of the plug so that the plug stopper faces upward (Figure 8). Fold the rubber plug over the cap to close (Figure 9). 3. Locate the bailer housing and o-ring (Figure 10). Place the o-ring over the neck of the bailer and push it down completely (Figure 11).
Driven by the boat's diesel engine, the propeller allows good progress to be made when the wind is not cooperating.. Under sail though the propeller is redundant and the fixed blades provide nothing but unwanted drag. This is greatly reduced if the blades can fold aft in a clamshell arrangement or feather in self-alignment with the water flow.
1. Plan Your Wiring System. Before you start wiring your small boat, it's important to have a plan in place. Identify the electrical components you will need, such as lights, pumps, and navigation equipment, and determine their locations on the boat. This will help you determine the length and type of wiring required.
A jib is used to improve handling and to increase sail area on a sailboat. This helps to increase speed. The jib gives control over the bow (front) of the ship, making it easier to maneuver the ship. The mainsail gives control over the stern of the ship. The jib is the headsail (frontsail) on a front-and-aft rig.
A basic sailboat is composed of at least 12 parts: the hull, the keel, the rudder, the mast, the mainsail, the boom, the kicking strap (boom vang), the topping lift, the jib, the spinnaker, the genoa, the backstay, and the forestay. Read all the way through for the definition of each sailboat part and to know how they work.
1. Attach the sails. Secure the bottom front ( tack) of the mainsail and jib to their respective shackles on the boom and the bow of the boat. There will be a small line ( outhaul) attaching the rear corner of the mainsail ( clew) to the end of the boom. Pull it so the foot of the main is taut, and cleat.
When you make your own wiring diagram use very large sheets of paper for clarity. Most boats will have positive and negative busses where area wires come together. Equipment coming off a switchboard or circuit panel should be straightforward to trace. On a small boat, sketching circuits in the boat outline helps you locate wires later.
Bow: the front of a boat. Stern: the rear of a boat. Port: left side of a boat. Starboard: right side of a boat. Helm: the driver's seat. Gunwale: the top of the boat's side (upper edge). If water comes higher than the gunwale, it enters the boat. Transom: The cross-section of the rear of the boat (stern).
The two-masted rigs are: Lugger - two masts (mizzen), with lugsail (a cross between gaff rig and lateen rig) on both masts. Yawl - two masts (mizzen), fore-and-aft rigged on both masts. Main mast is much taller than mizzen. Mizzen without a mainsail. Ketch - two masts (mizzen), fore-and-aft rigged on both masts.
Complete guide to wiring a boat electrical system from scratch. Starting from the 12V boat battery, we look at configuring a complete electrical system incl...
Step 2. Draw a simple electrical schematic (diagram) that shows each piece of equipment, the fuses, switches, and how all of this will be connected. This is not a diagram of where the equipment is located on the boat. That will come in Step 8. It is simply a diagram of the electrical circuits.
Hull - The watertight structural shell of a boat. Bow - The forward part of a boat. Stern - The aft part of the boat. Transom - The more or less flat surface that closes the hull at the stern. Rudder - The sailboat is steered by a fin-shaped appendage attached beneath the boat toward the stern which can be rotated to change the angle ...
General Parts. General Parts, Fittings, and Accessories for Small Sailboats. We offer a full range of sailboat hardware, blocks, cleats, shackles, dollies and trailers, accessories, and more. These parts are not necessarily specific to any one model of sailboat, but rather are general fittings that often work on a variety of boats for a variety ...
A typical small sloop like this sailboat has two sails, the mainsail and jib, and thus has two halyards - one to pull up the top corner ("head") of each sail. (We'll see this is Part 2 of this course.) At the end of a halyard is a fitting, called a shackle, that attaches the sail to the line.
Make small adjustments and observe how your boat responds to find the sweet spot. Genoa is a larger jib used to capture more wind. A genoa is a larger version of a standard jib. It overlaps the mainsail, extending further aft, and provides a greater sail area for improved upwind performance. Genoas are categorized by the percentage of overlap ...
Small sailboats are generally under 20 feet in length, come in a variety of designs, and have different hulls. These include monohulls, catamarans, and trimarans. As long as they have a mast, rudder, sail, and are under 20 feet, it is considered a small sailboat. According to experienced sailors that use a smaller boat, it is best to have one ...
One man has died and six people are missing after a luxury yacht sank in freak weather conditions off the coast of Sicily. The 56m British-flagged Bayesian was carrying 22 people - 12 passengers ...
There are three boat hull categories: displacement hulls, which displace water when moving; planing hulls, which create lift at high speeds; and semi-displacement hulls, which displace water and generate lift at low speeds. The most common hull types are round-bottomed, flat-bottomed, multi, V-shaped, and pontoon hulls.